
Hearty Chili Mac

A comforting one-pot Chili Mac that combines seasoned beef, chili beans, tomatoes, and elbow macaroni finished with melty cheese—perfect for weeknight family dinners.

This Chili Mac has been a weeknight cornerstone in my kitchen for years, the sort of dish that arrives at the table steaming and instantly lifts everyone’s mood. I first discovered this one-pot approach when I needed something flexible and forgiving on a busy night: pantry staples on hand, a modest block of time, and a hungry family. What makes this particular version special is the balance between saucy chili components and tender pasta—rich tomato flavor and warm spices without overwhelming heat. The texture swing from soft elbow macaroni to chunky beans and browned beef adds comforting variety in every bite.
I remember the night it became a family favorite: a cold, rainy evening with kids coming home dripping from soccer practice. I tossed browned beef, a can of chili beans, a jar of tomato sauce, and elbow macaroni into a deep skillet and let it bubble quietly until the pasta softened. We spooned the mixture into bowls, added a scattering of shredded Mexican cheese and a dollop of sour cream, and that communal hush of contentment—when everyone takes a second helping—sealed it as a permanent menu entry. In this article I’ll walk you through every detail: ingredient notes, step-by-step technique, storage and substitutions, serving ideas, and seasonal tweaks so you can make it your own.
Why You'll Love This Recipe
- One-pot convenience: everything cooks in a single skillet or Dutch oven so cleanup is fast and there are fewer pans to manage—perfect for busy weeknights.
- Pantry-friendly: uses common pantry items—canned tomatoes, chili beans, jarred pasta sauce, and a packet of chili seasoning—so it’s easy to pull together with minimal shopping.
- Family-pleasing flavors: mild heat and familiar tomato-beef notes make it approachable for kids, while optional toppings let adults customize intensity.
- Quick on the table: active prep is about 10 minutes and it simmers to readiness in roughly 15 minutes, so it’s ready in under 30 minutes total.
- Flexible portions and make-ahead friendly: doubles easily for crowds and reheats beautifully for lunches or leftovers.
When I serve this, I like to offer a small topping bar—sour cream, sliced avocado, chopped cilantro, and Fritos for crunch. My family’s favorite addition is a squeeze of lime and extra cheese; even picky eaters who shun beans seem to enjoy this version because the flavors are familiar and comforting.
Ingredients
- Olive oil: 1 tablespoon. I use a mild extra virgin olive oil for sautéing the aromatics; it adds a gentle fruitiness without overpowering the spices.
- Garlic: 2 cloves, minced. Fresh garlic brightens the base flavors—avoid pre-minced jars if possible; fresh delivers a cleaner, livelier punch.
- Onion: 1 medium, diced. Yellow onion provides sweet depth when sautéed; for a sharper note use white onion, or sweet onion for mellow sweetness.
- Ground beef: 1 1/2 pounds. I prefer 80/20 for flavor and juiciness; drain excess fat if you prefer a leaner dish.
- Beef broth: 2 cups. Use low-sodium broth so you can control seasoning; water works in a pinch but broth gives better savory backbone.
- Pasta sauce: 2 cups (about one 24-ounce jar). Choose a traditional tomato-based sauce—brands like Rao’s or your favorite jarred marinara lend consistent flavor.
- Diced tomatoes with green chile peppers: 10 ounces. These add a touch of brightness and mild green chile flavor without too much heat.
- Mild chili beans, undrained: 16 ounces (one can). The beans add texture, fiber, and classic chili character; keep the sauce from the can to build volume.
- Chili seasoning mix: 1 packet. A 1.25-ounce packet is typical—adjust to taste or use a homemade blend of chili powder, cumin, paprika, onion powder, and a pinch of cayenne.
- Elbow macaroni: 1 box (about 16 ounces). Classic elbow macaroni works best for catching sauce; you can substitute any small pasta shape.
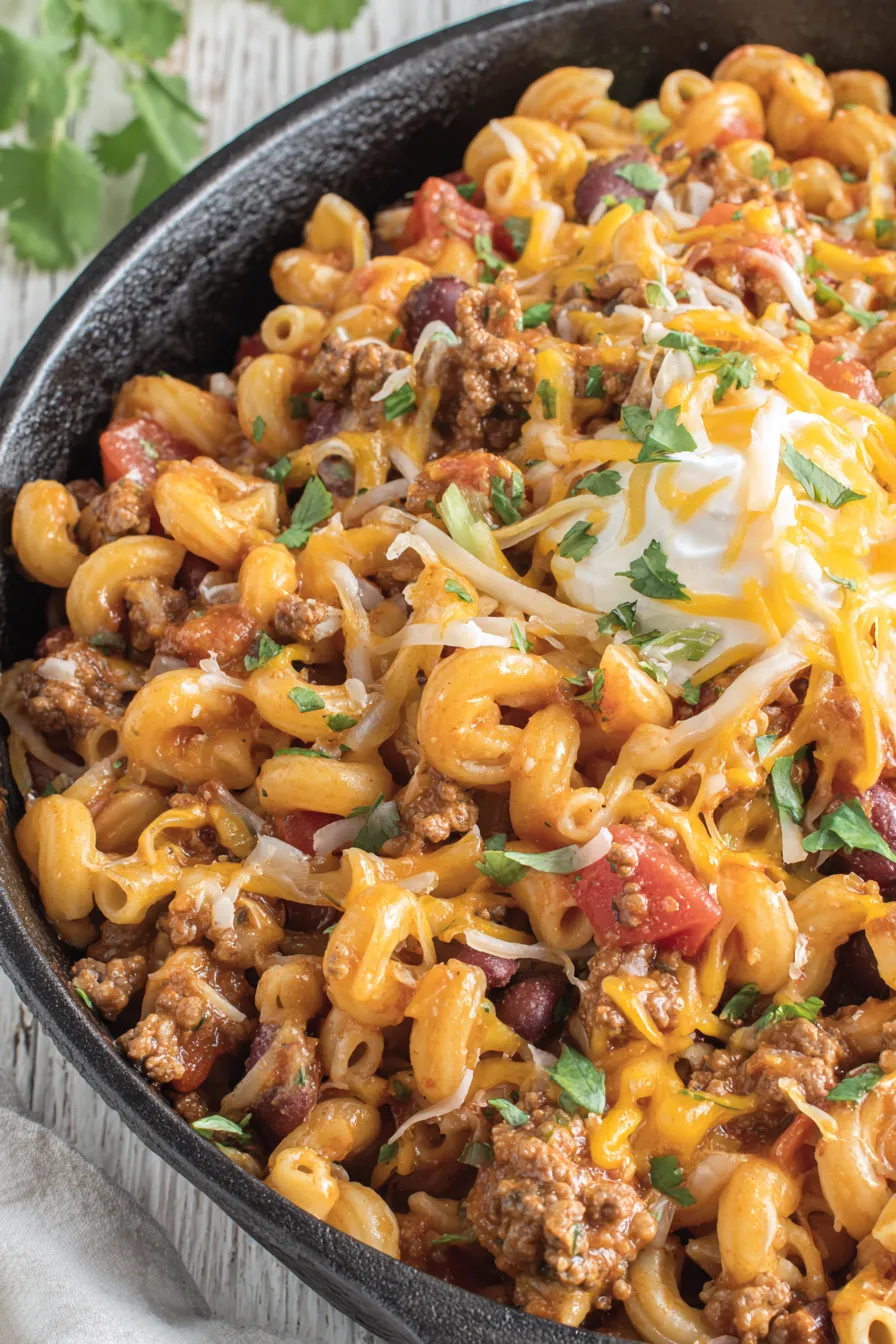
- Shredded Mexican 4-cheese blend: 2 cups for topping and melting. The blend of cheddar, Monterey Jack, and other cheeses gives great melt and flavor—use a pre-shredded mix or shred fresh for smoother melting.
Instructions
Heat and sauté: Warm 1 tablespoon olive oil in a large skillet or Dutch oven over medium-high heat until shimmering. Add 2 minced garlic cloves and 1 diced onion and sauté until the onion is translucent and just beginning to brown, about 3–4 minutes—watch closely so the garlic doesn’t burn, which turns it bitter. Brown the meat: Add 1 1/2 pounds ground beef to the pan. Break it up with a wooden spoon and cook until no longer pink and nicely browned, about 6–8 minutes. Browning builds flavor through the Maillard reaction; if excess fat renders, tilt the pan and spoon off surplus grease or drain in a colander for a leaner finish. Add liquids and seasonings: Stir in 2 cups beef broth, 2 cups pasta sauce, a 10-ounce can diced tomatoes with green chiles, 16 ounces mild chili beans (undrained), and one packet of chili seasoning. Stir to combine and bring the mixture to a gentle simmer. Taste and adjust salt—if using low-sodium broth you may want a pinch more salt or a dash of Worcestershire for depth. Cook the pasta: Add the entire box (about 16 ounces) elbow macaroni to the simmering mixture. Increase heat briefly to bring to a boil, then reduce to a low simmer. Cover and cook until the pasta is tender, about 13–15 minutes—stir every 5 minutes to prevent sticking and check the pasta at the lower end of that range to avoid overcooking. If the sauce thickens too much before the pasta is done, add an extra 1/4 cup beef broth or water. Melt the cheese and serve: Remove the pan from heat. Evenly sprinkle 2 cups shredded Mexican 4-cheese blend over the top, cover the pan for about 2 minutes to let the residual heat melt the cheese, or place briefly under a broiler for a browned finish if your skillet is oven-safe. Serve immediately with optional toppings: sour cream, sliced avocado, chopped cilantro, lime wedges, and crushed Fritos for crunch.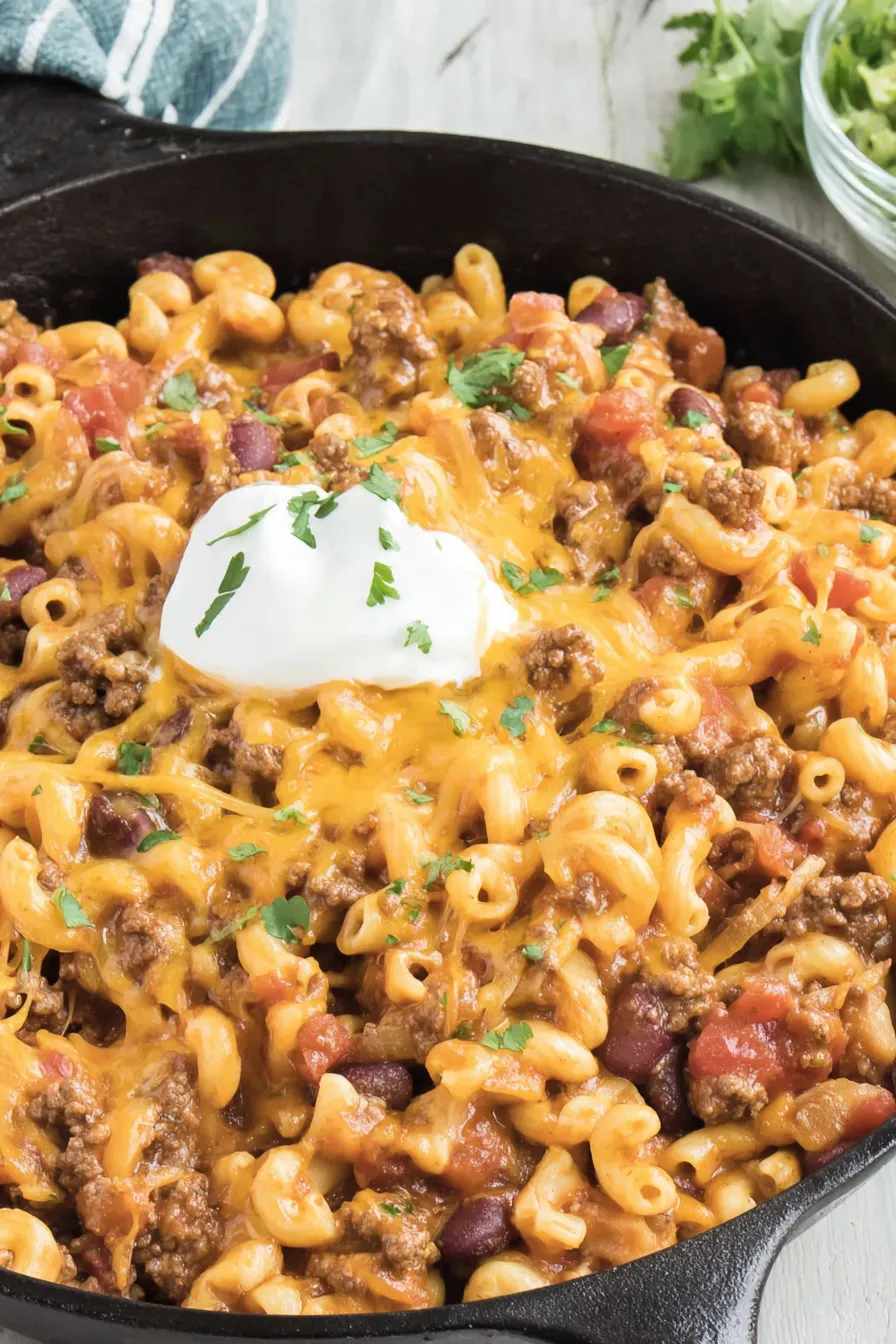
You Must Know
- This dish stores very well: refrigerate in an airtight container for up to 4 days, or freeze portions for up to 3 months—reheat gently and add a splash of broth if it dries out.
- High in protein and fiber thanks to the beef and beans, but contains dairy and gluten—see substitutions below for dietary adjustments.
- To keep the pasta from over-absorbing the sauce, finish cooking with a lid partially off and stir occasionally; add 1–2 tablespoons broth if it thickens prematurely.
- Melting the cheese under a lid uses residual heat and keeps the pasta moist—broiling gives a gratin effect if you prefer a crispy top.
My favorite part of this dish is how forgiving it is: I’ve doubled it for potlucks and simplified it for solo dinners by turning leftovers into burrito bowls. Readers often tell me they love the comforting, slightly smoky flavor and how readily kids accept the dish—neutral textures and familiar tastes make it a winner on busy nights.
Storage Tips
Allow the pot to cool slightly before transferring to airtight containers. Store in the refrigerator for up to 4 days; for longer storage portion into freezer-safe containers and freeze up to 3 months. When reheating, thaw overnight in the refrigerator if frozen, then reheat on the stovetop over medium-low adding 2–4 tablespoons of beef broth to revive the sauce. Avoid microwaving directly from frozen or the pasta may become gummy—slow, gentle reheating preserves texture.
Ingredient Substitutions
If you want to reduce fat, swap ground beef for ground turkey or chicken—use the same weight and brown thoroughly for flavor. For a vegetarian version, replace meat with cooked lentils or a plant-based mince and use vegetable broth. Use gluten-free elbow pasta to accommodate gluten-free diets, and substitute dairy-free shredded cheese for a lactose-free alternative. If you prefer a spicier profile, add 1/2 teaspoon cayenne or use diced tomatoes with hotter chiles.
Serving Suggestions
Serve with a scoop of creamy mashed avocado or a generous dollop of sour cream to balance the spice. A crisp green salad or roasted corn and black bean salad pairs well to add freshness. For a crunchy contrast, crushed Fritos or tortilla chips on top provide a nostalgic, fun texture—great for casual family dinners or game-day snacks.
Cultural Background
The combination of chili and macaroni has roots in American comfort cooking where regional chili traditions meld with accessible pasta shapes to create a hearty, budget-friendly meal. Variants range from Texas-style chili mac without beans to Midwestern casseroles that bake the mixture with extra cheese. This version borrows from convenience-style family cooking—canned beans and jarred sauce—elevated by fresh aromatics and careful browning of the meat.
Seasonal Adaptations
In winter, add roasted winter vegetables—diced butternut squash or sweet potato—for added heartiness. In summer, lighten the dish by using a tomato-herb sauce and topping with fresh chopped tomatoes and corn. For holiday gatherings, make a baked version in a casserole dish topped with extra cheese and breadcrumbs, broil until golden, and serve family-style.
Meal Prep Tips
Make a double batch and portion into single-serving containers for grab-and-go lunches. Keep cheese separate until reheating to preserve texture. For freezer meals, slightly undercook the pasta by 1–2 minutes before cooling and freezing—this prevents mushiness when reheated. Label containers with the date and contents so you can rotate through your freezer efficiently.
This Chili Mac is reliable, crowd-pleasing, and endlessly adaptable—once you get the basic proportions down, it becomes a canvas for whatever your pantry and taste preferences demand. Invite friends or feed a family; either way, it’s comfort in a bowl that I hope becomes a go-to in your home too.
Pro Tips
Brown the meat well to develop savory depth; the Maillard reaction adds flavor that carries through the dish.
If the liquid is absorbed but pasta still feels firm, add 1/4 cup beef broth and finish cooking uncovered for a minute at a time.
Drain excess fat after browning for a lighter final dish, or keep it for richer flavor—taste and adjust seasoning afterward.
This nourishing hearty chili mac recipe is sure to be a staple in your kitchen. Enjoy every moist, high protein slice — it is perfect for breakfast or as a wholesome snack any time.
FAQs about Recipes
Can I make this ahead and reheat it?
Yes—this reheats well. Thaw overnight if frozen and reheat gently on the stove with a splash of broth to restore creaminess.
How do I make this gluten-free?
Use gluten-free elbow pasta and check your chili beans and seasoning packet for gluten-containing ingredients.
How can I make a vegetarian version?
Substitute cooked lentils or a plant-based crumbles and use vegetable broth; add smoked paprika for depth.
Tags
Hearty Chili Mac
This Hearty Chili Mac recipe makes perfectly juicy, tender, and flavorful steak every time! Serve with potatoes and a side salad for an unforgettable dinner in under 30 minutes.
Instructions
Heat and sauté aromatics
Warm 1 tablespoon olive oil in a large skillet or Dutch oven over medium-high heat. Add 2 cloves minced garlic and 1 diced onion; sauté until translucent and slightly browned, about 3–4 minutes. Avoid burning the garlic.
Brown the meat
Add 1 1/2 pounds ground beef and break into pieces. Cook until browned and no longer pink, about 6–8 minutes. Drain excess fat if desired to control richness.
Add liquids and seasoning
Stir in 2 cups beef broth, 2 cups pasta sauce, 10 ounces diced tomatoes with green chiles, 16 ounces mild chili beans (undrained), and 1 packet chili seasoning. Bring to a simmer and taste for seasoning.
Cook the pasta
Add 1 box elbow macaroni and bring to a boil, then reduce to a low simmer. Cover and cook 13–15 minutes until pasta is tender, stirring periodically to prevent sticking. Add a splash of broth if mixture becomes too thick.
Finish with cheese and serve
Remove from heat and sprinkle 2 cups shredded Mexican 4-cheese blend over the top. Cover for about 2 minutes to let cheese melt, then serve with optional sour cream, avocado, and Fritos.
Last Step: Please leave a rating and comment letting us know how you liked this recipe! This helps our business to thrive and continue providing free, high-quality recipes for you.
Nutrition
Did You Make This?
Leave a comment & rating below or tag
@royalmorsel on social media!
Categories:
You might also like...

Cheeseburger Queso Sliders
Juicy beef, sweet-charred peppers, and a silky queso drizzle turn these sliders into the ultimate crowd-pleasing bite for game day or weeknight fun.

Short Ribs with Garlic Mash
Melt-in-your-mouth braised short ribs nestled over creamy garlic mashed potatoes, all in a rich, herb-scented sauce that feels like a warm hug.

Cheesy Garlic Pull-Apart Bread
Golden, garlicky pull-apart loaf swaddled in buttery herbs and stretchy mozzarella that begs to be shared warm from the oven.
Did You Make This?
Leave a comment & rating below or tag @royalmorsel on social media!
Rate This Recipe
Share This Recipe
Enjoyed this recipe? Share it with friends and family, and don't forget to leave a review!
Comments (1)
This recipe looks amazing! Can't wait to try it.
Comments are stored locally in your browser. Server comments are displayed alongside your local comments.

Hi, I'm Emma!
What's Popular

30-Minute Meals!
Join to receive our email series which contains a round-up of some of our quick and easy family favorite recipes.