
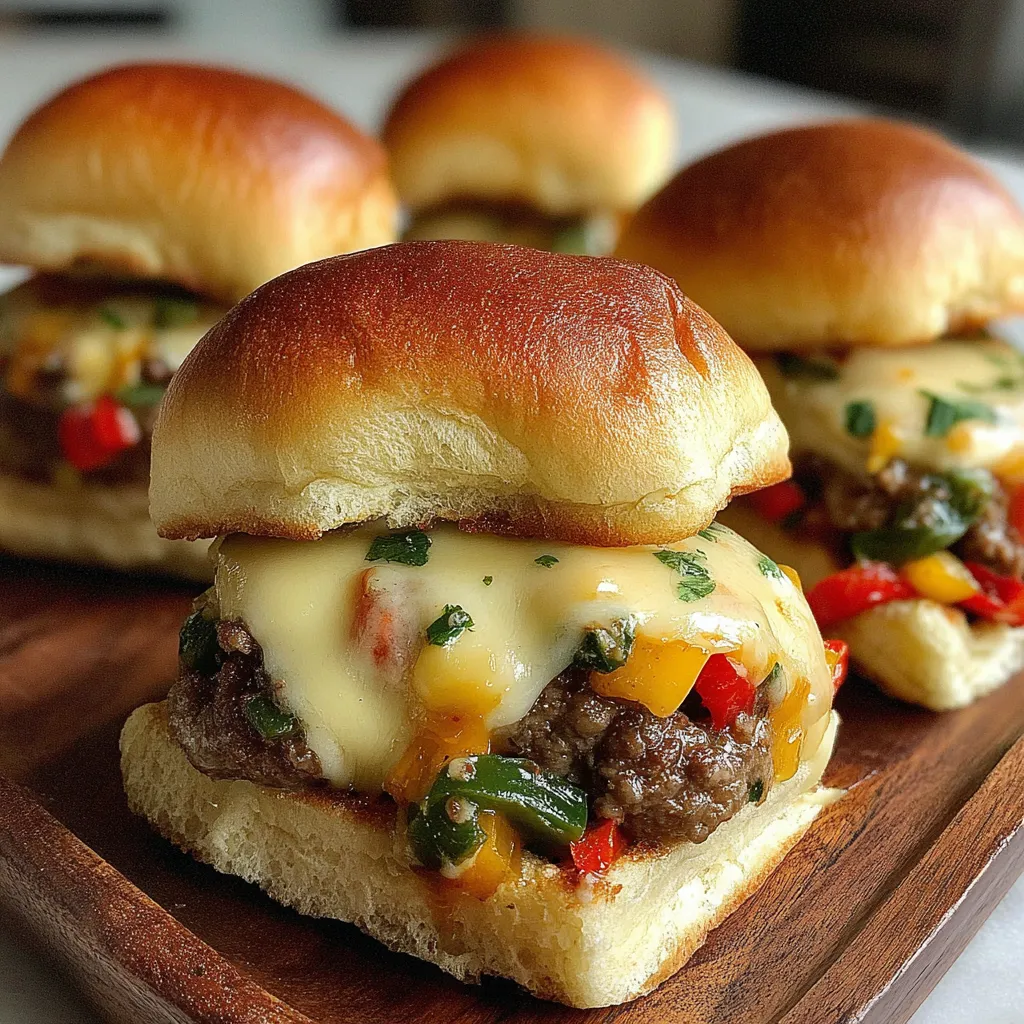
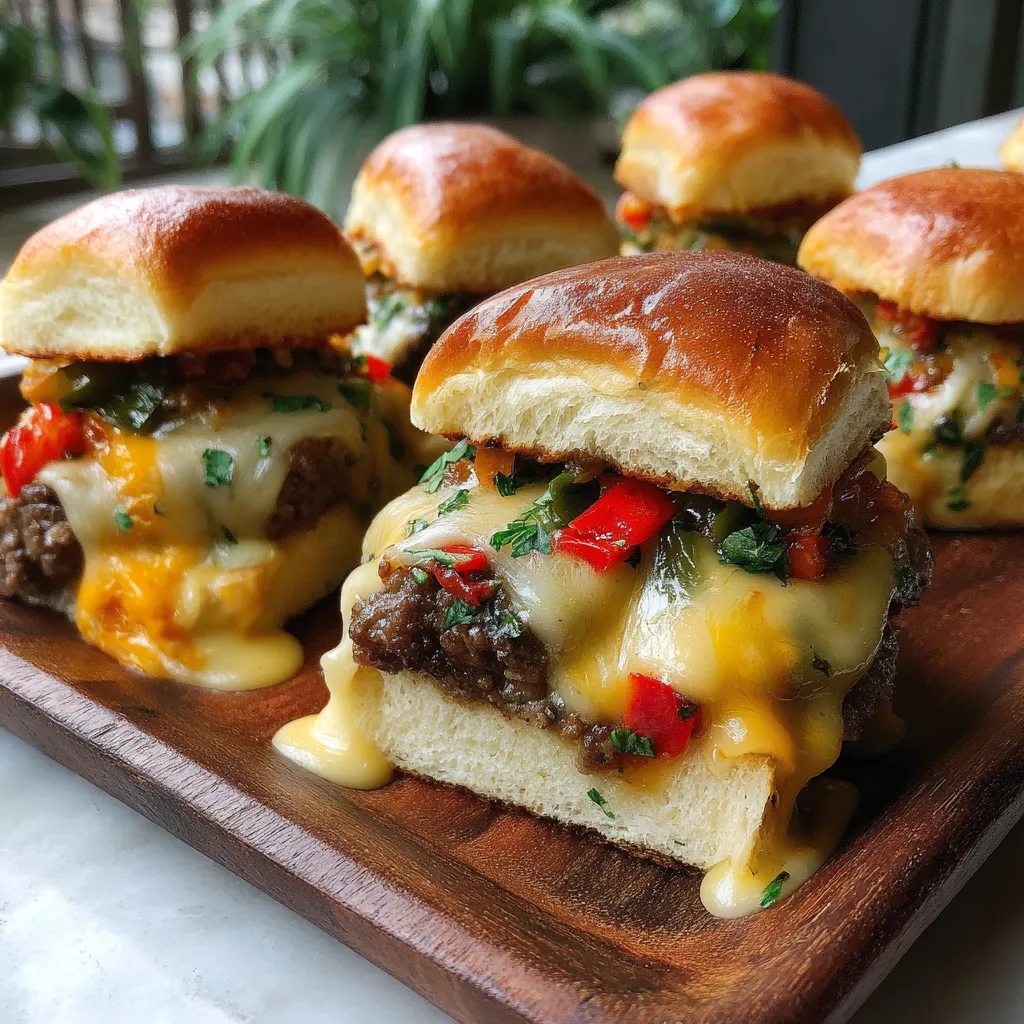
Cheeseburger Queso Sliders

Juicy beef, sweet-charred peppers, and a silky queso drizzle turn these sliders into the ultimate crowd-pleasing bite for game day or weeknight fun.

Why You'll Love This Recipe
- Big flavor, small format: juicy 80/20 ground chuck, melty American cheese, and creamy queso in every bite.
- Weeknight-friendly: about 20 minutes of active cooking and a short chill for the patty keeps things easy.
- Make-ahead components: sauté the peppers and mix the queso ahead; reheat gently when ready to assemble.
- Customizable heat: mild with sweet bell peppers, or add extra poblano or hot sauce for a kick.
- Party-perfect: scales up effortlessly, and the queso can be served on the side for dipping.
- Pantry-smart: uses staple items like Rotel, American cheese, and slider buns you can keep on hand.
When I served these the first time, my family started dipping the sliders straight into a bowl of queso and declared it the only way to eat them. I loved how the poblano added a gentle smokiness without overwhelming the kids. The leftovers, if you are lucky enough to have any, reheat beautifully for the next day’s lunch.
Ingredients
- 80/20 ground chuck: Use 1 1/2 pounds for juicy, flavorful sliders. The fat renders and bastes the meat, helping build a crisp crust and tender interior. Look for bright, fresh ground chuck with visible marbling.
- Red bell peppers: Three peppers bring sweetness and color contrast. Choose firm, shiny peppers with thick walls for better caramelization and bite.
- Sweet onion: One medium onion adds mellow sweetness that balances the richness of the meat and queso. Yellow or Vidalia both work well.
- Poblano peppers: Two peppers, deseeded and chopped, add mild heat and a smoky depth. Choose dark green, glossy poblanos without soft spots.
- Avocado oil: Two to three tablespoons provide a high-smoke-point sear for veggies and buns. It keeps flavors clean and toasty.
- Heavy cream: About 1 1/4 cups warms into a silky base for queso that coats without clumping. Simmer gently to avoid scorching.
- White queso cheese: Eight ounces cut into chunks melt smoothly and bring creamy saltiness. Look for a good melting cheese labeled queso blanco.
- Rotel diced tomatoes and green chilies: One 8-ounce can adds tang and gentle heat, keeping the queso lively and scoopable.
- American cheese slices: Classic meltability and that signature cheeseburger flavor. Layer generously for oozy results.
- Slider buns: Soft buns toast beautifully and soak up juices. Brioche or potato buns are especially good here.
- Garlic aioli: A swipe on the bun adds creaminess and a savory punch that brightens every bite.
- Beef rub, salt, and pepper: Season boldly to amplify crust, balance the vegetables, and sharpen the queso’s flavor.
Instructions
Form and chill the patty: Press the ground chuck into one large, even patty roughly 1/2 inch thick and about 1/2 inch wider than your slider buns. Season the top generously with beef rub. Chill uncovered for 30 minutes to firm the surface so it sears instead of steams. Sauté the peppers and onion: Heat 2 tablespoons avocado oil in a large skillet or griddle over medium-high heat. Add red bell peppers, sweet onion, and poblano. Cook 6 to 8 minutes, stirring often, until glossy. Season with a pinch of salt, then cook 4 to 6 minutes more until lightly caramelized. Transfer to a warm plate. Make the queso: In a medium saucepan over medium heat, bring the heavy cream just to a gentle simmer. Whisk in the white queso cheese a handful at a time until smooth. Stir in the Rotel with its juices. Season with salt and pepper to taste, then hold over low heat, stirring occasionally, so it stays pourable. Sear the patty and melt the cheese: Return the griddle to medium-high. Add a thin film of oil if needed. Sear the chilled patty for 4 to 5 minutes, undisturbed, until a deep crust forms. Flip, season the second side with beef rub, and cook 2 minutes. Top with the sautéed vegetables and arrange American cheese slices over the top. Cover loosely or tent to encourage melt. Toast the buns: While the cheese melts, split and toast slider buns cut side down on the griddle or in a clean skillet until golden, 1 to 2 minutes. Spread the bottoms lightly with garlic aioli. Slice and assemble: Transfer the patty to a board and cut into slider-sized squares. Layer meat, melted cheese and vegetables onto the bun bottoms. Drizzle with warm queso or serve queso on the side for dipping. Cap with bun tops and serve immediately.
You Must Know
- Queso should be warm and pourable, not thick. Keep it over low heat and whisk often.
- Chilling the patty ensures a better sear and prevents crumbling when you slice.
- Toasting buns adds structure so they do not get soggy under melted cheese and queso.
- Veggies can be cooked a day ahead and reheated; the flavors deepen overnight.
- These sliders are rich; serve with a crisp salad or crunchy slaw to balance.
My favorite moment is slicing the giant patty and seeing that sheet of melted cheese drape over the vegetables. It always gets a chorus of whoa at the table. I also love setting out a little bowl of queso for dipping; it turns a casual dinner into an interactive, almost fondue-like moment that even picky eaters enjoy.
Storage Tips
Store leftover components separately for best texture. Keep cooked beef and vegetables together in an airtight container up to 3 days in the refrigerator. Refrigerate the queso in a microwave-safe container for up to 4 days; rewarm gently at 50 percent power in 20-second bursts, whisking between bursts, or stir over low heat with a splash of cream to loosen. Toast buns just before serving so they keep their structure. Assembled sliders are best fresh but can be reheated briefly in a 300 Fahrenheit oven for 8 to 10 minutes, uncovered, to restore warmth and a little toast.
Ingredient Substitutions
Swap ground chuck with ground sirloin plus 1 tablespoon avocado oil for a leaner option, though you will lose a touch of juiciness. Monterey Jack or Pepper Jack can replace white queso cheese; start with 8 ounces and melt into 1 1/4 cups cream for a similar texture. If you only have a 10-ounce can of Rotel, use about 3/4 of the can to keep the queso from thinning too much. Brioche or potato slider buns are interchangeable. No poblano on hand? Add an extra bell pepper and a pinch of smoked paprika. For a gluten-free route, serve the meat on lettuce cups and ensure your aioli is certified gluten-free.
Serving Suggestions
Present the sliders on a warm platter with a small bowl of queso for dipping and a sprinkle of chopped cilantro or scallions for freshness. Add crunchy dill pickles or pickled jalapeños on the side for acidity. Pair with baked potato wedges, a simple green salad with a lemony vinaigrette, or grilled corn for a cookout vibe. For game day, keep the sliders on a warming tray and set out toppings like sliced tomatoes, shredded lettuce, and hot sauce so guests can customize.
Cultural Background
These sliders blend classic American diner flavors with Tex-Mex comfort. The single-patty technique borrows from griddle-style burgers that prioritize crust and juice, while the queso nods to the border’s love of creamy, chile-laced cheese dips. Rotel’s iconic tomatoes and green chilies are a pantry staple across the South and Southwest, and they bring a familiar, nostalgic tang that plays perfectly with American cheese. It is a mash-up that feels both modern and timeless, made for casual gatherings and festive weekends.
Seasonal Adaptations
In summer, toss diced fresh tomatoes and roasted hatch chiles into the queso for a seasonal spin. When fall arrives, add a pinch of chili powder and smoky paprika to the beef rub for deeper warmth. Winter calls for a heartier build with sautéed mushrooms and a few dashes of Worcestershire. In spring, swap some bell peppers for tender asparagus tips, blanched and seared for a minute. You can also brighten the aioli with lemon zest and fresh herbs like chives or parsley year-round.
Meal Prep Tips
Form and season the large patty up to 24 hours in advance and refrigerate, uncovered, for the first hour to dry the surface, then cover to prevent odor transfer. Cook the pepper-onion mixture 1 to 2 days ahead and reheat on the griddle. Make the queso the day you plan to serve for best silkiness; rewarm gently with a splash of cream. Toast buns just before assembling so they stay crisp. For packed lunches, store meat and buns separately, then reheat the meat and assemble right before eating to keep the bun from softening.
In the end, these sliders have a way of turning any meal into a little celebration. Set out the warm platter, pass the queso, and watch the smiles spread as everyone builds their perfect bite.
Pro Tips
Chill the patty to lock in shape and promote a crisper sear.
Salt the vegetables in the middle of cooking to draw out moisture and speed browning.
Hold queso over low heat and whisk often to maintain a smooth pour.
Toast buns right before assembling to prevent sogginess.
Slice the patty with a long, sharp knife for clean slider portions.
This nourishing cheeseburger queso sliders recipe is sure to be a staple in your kitchen. Enjoy every moist, high protein slice — it is perfect for breakfast or as a wholesome snack any time.
FAQs about Recipes
Can I make any parts ahead of time?
Yes. Shape the patty, season, and chill up to 24 hours ahead. Cook the vegetables 1 to 2 days in advance and refrigerate. Make the queso the day of serving for the best texture, reheating over low heat if needed.
How can I make this gluten-free?
Use lettuce cups or gluten-free slider buns. Confirm your garlic aioli is gluten-free, and double-check processed cheese ingredients if you have sensitivities.
What if my queso gets too thick?
Keep the queso over low heat and whisk frequently. If it thickens, add 1 to 2 tablespoons warm cream and whisk until smooth.
How long should I cook the large patty?
Sear 4 to 5 minutes on the first side and 2 minutes on the second after the flip, then top and melt. The center should be juicy with a well-browned crust.
Tags
Cheeseburger Queso Sliders
This Cheeseburger Queso Sliders recipe makes perfectly juicy, tender, and flavorful steak every time! Serve with potatoes and a side salad for an unforgettable dinner in under 30 minutes.
Ingredients
For the sliders
For the queso
Instructions
Form and chill the patty
Shape the ground chuck into one large patty about 1/2 inch thick and 1/2 inch wider than your slider buns. Season the top with beef rub and chill for 30 minutes to firm.
Sauté the vegetables
Heat 2 tbsp avocado oil over medium-high in a large skillet or griddle. Cook bell peppers, onion, and poblano 6–8 minutes. Season with salt and cook 4–6 minutes more until softened and lightly caramelized. Set aside.
Prepare the queso
In a saucepan over medium heat, bring heavy cream to a gentle simmer. Gradually whisk in white queso cheese until smooth. Stir in Rotel with juices; season with salt and pepper. Hold over low heat.
Sear the patty
Reheat griddle to medium-high. Add a thin film of oil if needed. Sear patty 4–5 minutes. Flip, season the second side with beef rub, and cook 2 minutes more.
Top and melt
Spoon sautéed vegetables over the patty. Arrange American cheese slices on top. Cover briefly or tent with foil to melt without overcooking.
Toast the buns
Toast slider buns cut side down on the griddle or in a skillet until golden, 1–2 minutes. Spread bottoms with garlic aioli.
Slice and assemble
Cut the patty into slider-sized portions. Layer meat with melted cheese and vegetables onto bun bottoms. Drizzle with warm queso or serve queso on the side. Top and serve immediately.
Last Step: Please leave a rating and comment letting us know how you liked this recipe! This helps our business to thrive and continue providing free, high-quality recipes for you.
Nutrition
Did You Make This?
Leave a comment & rating below or tag
@royalmorsel on social media!
Categories:
You might also like...
Cheeseburger Queso Sliders
Juicy beef, sweet-charred peppers, and a silky queso drizzle turn these sliders into the ultimate crowd-pleasing bite for game day or weeknight fun.

Short Ribs with Garlic Mash
Melt-in-your-mouth braised short ribs nestled over creamy garlic mashed potatoes, all in a rich, herb-scented sauce that feels like a warm hug.

Cheesy Garlic Pull-Apart Bread
Golden, garlicky pull-apart loaf swaddled in buttery herbs and stretchy mozzarella that begs to be shared warm from the oven.
Did You Make This?
Leave a comment & rating below or tag @royalmorsel on social media!
Rate This Recipe
Share This Recipe
Enjoyed this recipe? Share it with friends and family, and don't forget to leave a review!
Comments (1)
This recipe looks amazing! Can't wait to try it.
Comments are stored locally in your browser. Server comments are displayed alongside your local comments.

Hi, I'm Emma!
What's Popular

30-Minute Meals!
Join to receive our email series which contains a round-up of some of our quick and easy family favorite recipes.