
>>

Bite-sized fried treats: creamy cotton candy–flavored cheesecake wrapped in golden biscuit dough and dusted with sugar and spun cotton candy — a playful celebration dessert.
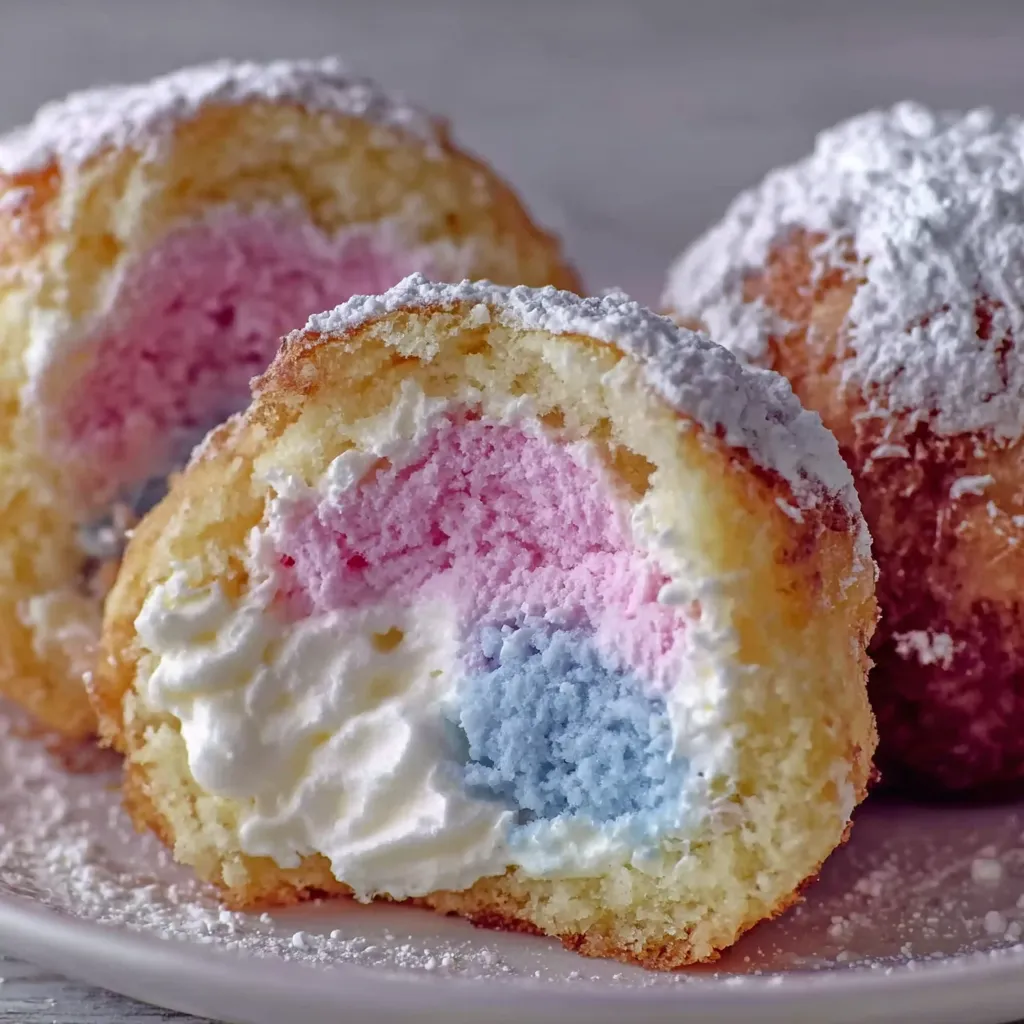
This playful dessert started as a whimsical experiment for a summer block party and quickly became my most requested sweet. I first combined the nostalgia of carnival cotton candy with a smooth cheesecake center one late afternoon while testing party bites for a friend's birthday. The result surprised me: the cotton candy flavoring, folded into a classic cheesecake base, gives a light, airy sweetness that pairs unexpectedly well with the rich cream cheese. When enclosed in a soft biscuit shell then shallow-fried to a golden crisp, the contrast of textures — crunchy exterior against lusciously creamy interior — makes every bite memorable.
I discovered the technique while adapting a favorite fried dough ball I serve at the holidays. Small adjustments — chilling the filling a little longer and using a delicate whipped topping folded into the cream cheese — prevented rupture during frying and kept the center pillowy. These little bombs are perfect for celebrations, potlucks, or whenever you want a show-stopping dessert that feels both nostalgic and slightly grown-up. Serve them straight from the fryer with a cloud of spun sugar and watch smiles appear.
I brought these to a summer block party and everyone asked for the recipe. Kids loved the cotton-candy crown and adults loved the creamy center and crisp shell. After several tweaks — slightly more cream to loosen the filling and a brief chill to firm it — these bombs came out reliably perfect every time. My family now requests them for birthdays instead of cake.
My favorite thing about making these is handing one to someone and watching their expression as they see the cotton candy crown and then taste the creamy interior. At a family get-together, an elderly aunt who rarely indulges in fried sweets took one bite and declared them the best thing on the table. Seeing that reaction convinced me to keep this dessert in my repertoire for special occasions.
Because the filling is dairy-based, store any leftovers refrigerated in an airtight container for up to 48 hours; texture softens over time as sugar draws moisture. For longer storage, freeze shaped but unfried bombs on a parchment-lined tray until solid, then bag them for up to three months. When reheating fried bombs, use a 325°F oven for 6 to 8 minutes to recrisp the shell without overheating the filling. Freshly fried is always best; the cotton candy garnish should be added just before serving since it dissolves quickly.
If you prefer a lighter filling, substitute half the cream cheese with mascarpone for a silkier mouthfeel. For a dairy-free variation, use plant-based cream cheese and a dairy-free whipped topping, though texture and flavor will differ slightly. Swap the canned biscuit dough for homemade yeast dough if you want a chewier wrapper — allow extra rising time and adjust frying time accordingly. If cotton candy flavoring is unavailable, a small amount of raspberry extract or bubblegum flavoring gives a similar nostalgic note.
Serve these on a platter with small spoons and cocktail napkins; garnish with tiny tufts of cotton candy and a light dusting of powdered sugar for a fairground look. Pair them with an espresso or a sparkling wine to cut the richness. For a kids’ party, arrange them alongside brightly colored sprinkles or a shallow bowl of flavored sugar for guests to roll their own. They also make a whimsical dessert course after a casual barbecue or as part of a festival-themed menu.
Fried filled dough balls have long been a global comfort — from Italian bomboloni to American fried pies — and combining them with sweet flavored fillings recalls carnival and boardwalk treats. This interpretation merges the classic cream-cheese center often found in modern American pastries with the cotton candy flavor that evokes fairs and county shows. It’s a playful reinvention bridging nostalgic flavors with contemporary, bite-sized presentation.
In spring and summer, bright cotton candy flavor feels right at home; in fall, swap the cotton candy extract for a pumpkin-spice cream cheese filling and finish with cinnamon-sugar. For winter holidays, stir a teaspoon of peppermint extract into the filling and roll the fried bombs in crushed candy cane and sugar. The basic technique adapts easily with seasonal extracts and coatings to match holidays or themed parties.
Prep the filling and shape all bombs up to 24 hours ahead; keep them refrigerated until ready to fry. For parties, fry in small batches to keep bombs hot; transfer finished bombs to a warm oven set to 200°F for a few minutes if you need to hold them briefly. Use a wire rack over a sheet pan rather than paper towels to prevent sogginess when holding multiple batches for serving.
These crispy cotton candy cheesecake bombs are a guaranteed conversation starter: playful, indulgent, and surprisingly straightforward once you master the shaping and frying technique. Make them your own and enjoy the smiles they bring.
Chill the filling for at least 30 minutes so it holds shape during frying and reduces the risk of rupture.
Use a deep-fry thermometer and keep oil at 350°F for consistent browning and minimal oil absorption.
Work with a small scoop for uniform portioning so all bombs cook evenly.
If seams won’t seal, moisten the dough edge with a little water to help it stick.
Fry in small batches to avoid temperature drops that cause soggy shells.
This nourishing crispy cotton candy cheesecake bombs recipe is sure to be a staple in your kitchen. Enjoy every moist, high protein slice — it is perfect for breakfast or as a wholesome snack any time.
Yes. You can shape the bombs and freeze them on a tray, then transfer to a freezer bag for up to 3 months; fry from frozen, adding about 30 seconds to the frying time.
Maintain oil at 350°F; if you don't have a thermometer, test with a small piece of dough—if it browns in about 30 seconds, the oil is near the correct temperature.
This Crispy Cotton Candy Cheesecake Bombs recipe makes perfectly juicy, tender, and flavorful steak every time! Serve with potatoes and a side salad for an unforgettable dinner in under 30 minutes.
Beat softened cream cheese until smooth. Add powdered sugar, vanilla, and cotton candy flavoring. Fold in whipped topping and heavy cream until homogenous. Refrigerate for 30 minutes to firm for shaping.
Dust the work surface with flour and flatten each biscuit to 1/8 inch thickness with a rolling pin. Keep dough covered to prevent drying.
Scoop 1 to 2 tablespoons of filling, center on each dough round, fold and pinch seams to seal, then roll into a smooth ball. Chill formed bombs 10 minutes before frying.
Heat oil to 350°F in a deep pot. Fry bombs in small batches 1 to 2 minutes per side until golden brown, maintaining oil temperature between batches.
Drain on paper towels, roll warm bombs in granulated sugar, dust with powdered sugar, and garnish with small tufts of cotton candy just before serving.
Last Step: Please leave a rating and comment letting us know how you liked this recipe! This helps our business to thrive and continue providing free, high-quality recipes for you.
Leave a comment & rating below or tag
@royalmorsel on social media!

Juicy beef, sweet-charred peppers, and a silky queso drizzle turn these sliders into the ultimate crowd-pleasing bite for game day or weeknight fun.

Melt-in-your-mouth braised short ribs nestled over creamy garlic mashed potatoes, all in a rich, herb-scented sauce that feels like a warm hug.

Golden, garlicky pull-apart loaf swaddled in buttery herbs and stretchy mozzarella that begs to be shared warm from the oven.
Leave a comment & rating below or tag @royalmorsel on social media!
Enjoyed this recipe? Share it with friends and family, and don't forget to leave a review!
This recipe looks amazing! Can't wait to try it.
Comments are stored locally in your browser. Server comments are displayed alongside your local comments.

Join to receive our email series which contains a round-up of some of our quick and easy family favorite recipes.
