
Copycat Dairy Queen Ice Cream Cake

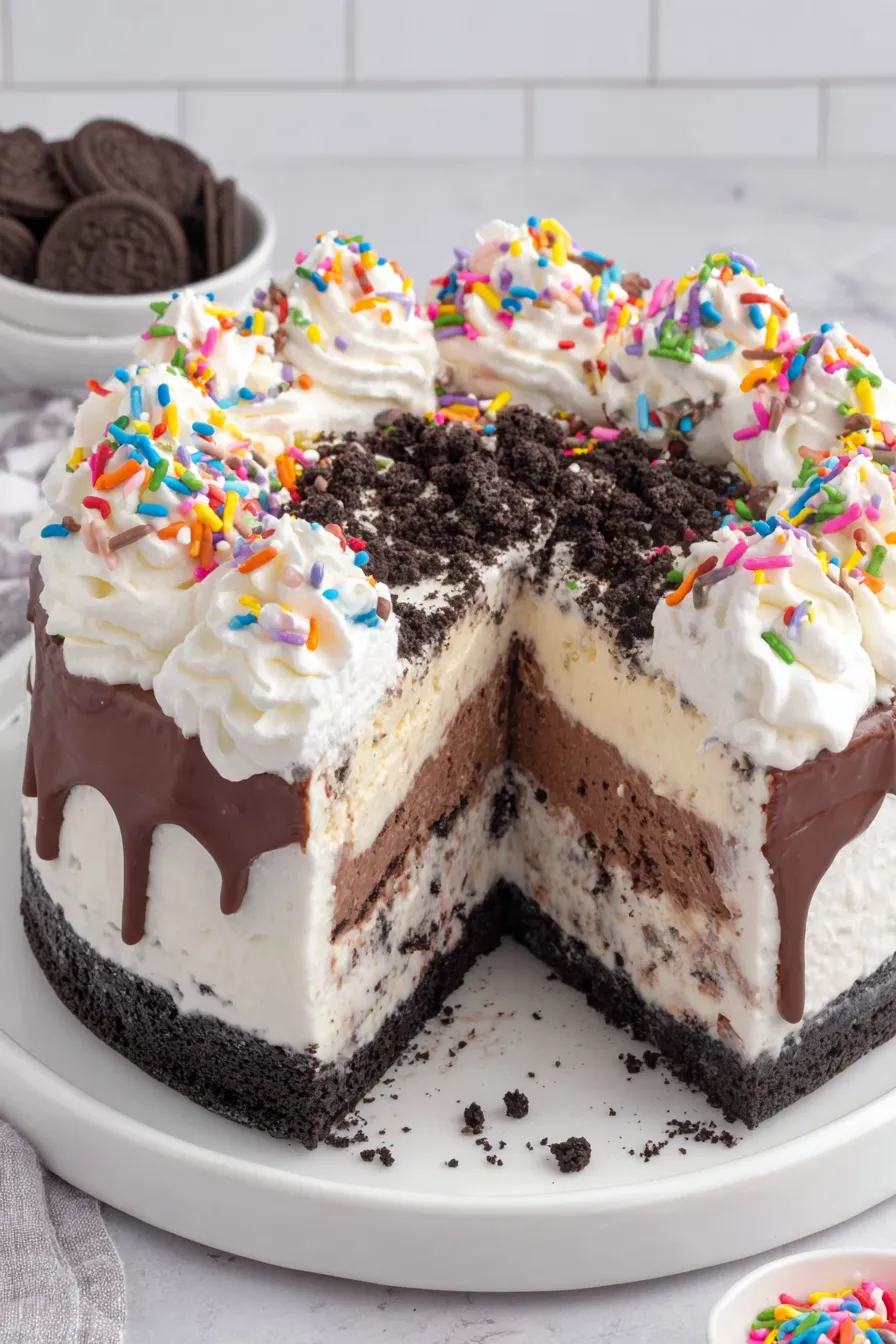
A nostalgic, make-at-home version of the classic creamy layered ice cream cake with a crunchy cookie base, hot fudge ribbon, and cloudlike whipped cream frosting.
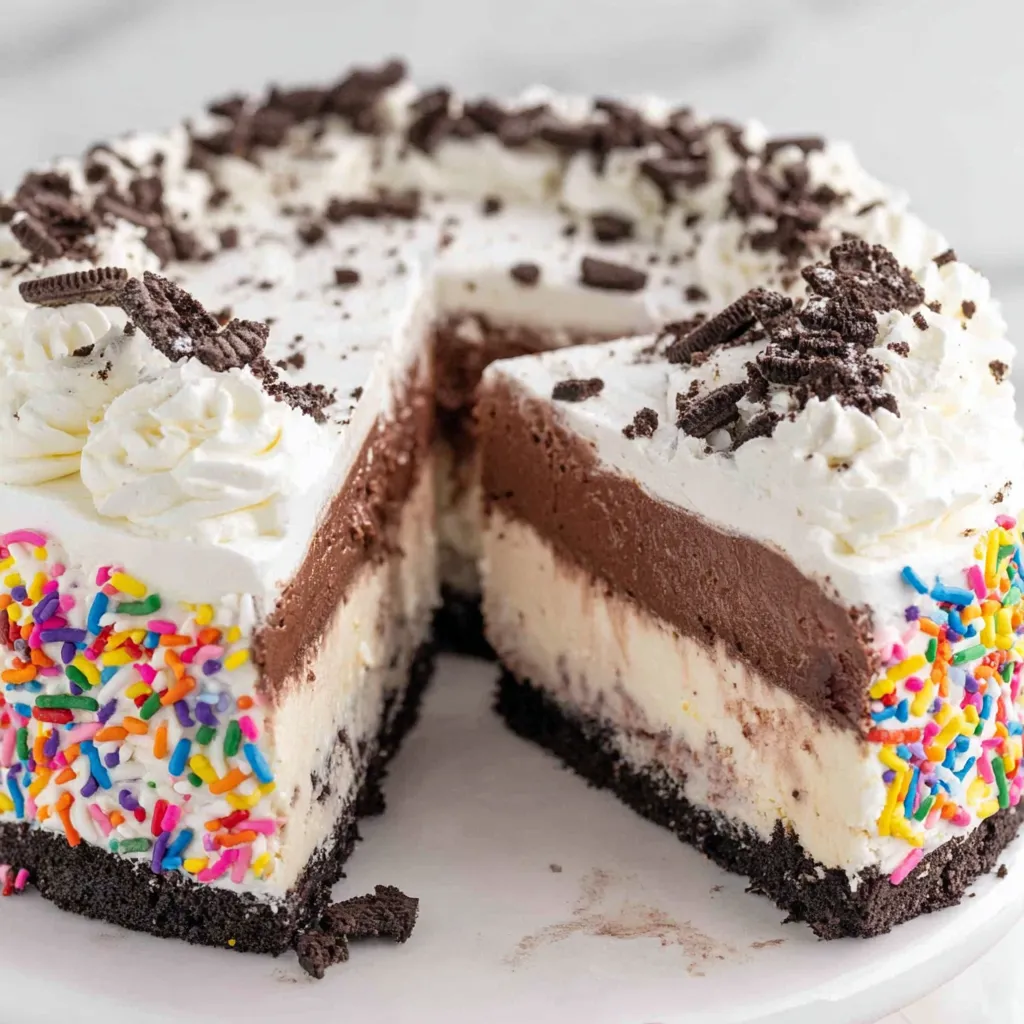
This Copycat Dairy Queen Ice Cream Cake is one of those desserts that instantly takes me back to childhood birthday parties: fluorescent candles, paper plates, and that satisfying first forkful that combined crunchy cookie, fudgy ribbon, and two layers of ice cream. I first recreated this at home the summer I hosted a backyard party and realized I could replicate the familiar textures and dramatic presentation without a long bakery run. It quickly became our family's celebration staple because it tastes indulgent yet is shockingly simple to assemble.
What makes this version special is the attention to small details: I use chocolate sandwich cookies with the cream centers intact to keep the base rich and slightly chewy, a good quality hot fudge for a glossy ribbon that never cracks, and vanilla bean ice cream to add flecks of real vanilla for depth. The whipped cream frosting is stabilized just enough through cold bowls and whipping technique to pipe pretty borders while remaining light and cloudlike. If you love retro treats and want a dessert that impresses without fuss, this is worth making the next time you celebrate.
Why You'll Love This Recipe
- The assembled cake is ready to freeze and serve in under 6 hours, with active hands-on time of about 30 minutes, making it great for busy hosts.
- It uses pantry staples and store-bought ice cream and hot fudge, so you get big bakery flavor with minimal effort and predictable results.
- The cookie base provides great textural contrast to the creamy layers; use a sturdy springform pan for perfect edges and easy unmolding.
- This format is highly customizable: swap flavors, add mix-ins, or make a smaller pan for fewer servings—ideal for parties or last-minute celebrations.
- The whipped cream finish pipes beautifully and stays stable when chilled in cold bowls, so you can prep in advance and decorate quickly before serving.
Personally, I love how everyone immediately recognizes the flavor profile and how even picky eaters tend to request a slice. At that first backyard party, my neighbor asked for the recipe on the spot, and ever since it's been my go-to for birthdays and summer gatherings. The look of surprise when people see homemade layers is priceless.
Ingredients
- Cookie Layer: 20 chocolate sandwich cookies with cream centers (about 8 ounces), crushed; choose a familiar brand for that recognizable bite and keep the filling to bind crumbs for a chewy base.
- Salted sweet cream butter: 4 tablespoons, melted; salted butter enhances the cookie crumbs and balances the sweetness of the ice cream and fudge—use good quality butter for a cleaner flavor.
- Chocolate ice cream: 1 quart; full-fat, scoopable straight from the freezer provides the best texture and will thaw evenly for spreading.
- Vanilla ice cream: 1 quart (I prefer vanilla bean for tiny specks of real vanilla flavor that elevate the simple layer).
- Hot fudge topping: 11.75 ounces; a thick, glossy jarred sauce works best—heat briefly so it spreads without chilling the ice cream below.
- Heavy cream: 2 cups cold; chilling the bowl and beaters helps achieve stable stiff peaks for piping.
- Powdered sugar: 1 1/4 cups; dissolves quickly into cold cream and adds structure to the frosting.
- Clear vanilla flavoring: 1 1/2 teaspoons; retains a bright vanilla note without adding color and blends smoothly into the whipped topping.
- Colorful sprinkles (optional): A few tablespoons for a nostalgic finish—use nonpareils or jimmies depending on the look you want.
Instructions
Prepare the pan:Line a 9-inch springform pan with plastic wrap, leaving extra overhanging at the edges to help lift the cake later. This not only protects the pan but creates a smooth surface for unmolding.Make the cookie base:Heat the oven to 350°F. Line a 10x15-inch baking sheet with parchment paper. In a small bowl, combine 20 crushed chocolate sandwich cookies (with centers) and 4 tablespoons melted salted sweet cream butter. Stir until evenly moistened. Spread the crumbs in a thin, even layer on the prepared sheet and bake for 7 to 8 minutes to set the crumbs. Let cool completely; baking briefly firms the crumbs so they won’t become soggy when layered.Soften the chocolate layer:Remove the chocolate ice cream from the freezer 15 to 20 minutes before using so it becomes spreadable but not melted. Scoop into the lined springform pan and smooth into an even layer with an offset spatula. Freeze 30 minutes to 1 hour to firm up before adding the next components.Warm the hot fudge:Heat the jarred hot fudge topping for 20 to 25 seconds in the microwave to make it pourable. If it’s too hot, let it sit 30 seconds. Spread evenly over the chilled chocolate layer using an offset spatula to create a glossy ribbon that will set in the freezer.Add cookie crumbs and chill:Evenly sprinkle the baked cookie crumbs over the hot fudge layer, pressing lightly so some crumbs adhere. Return to the freezer for 1 hour to let the fudge set and refrigerate the crumbs into a cohesive layer.Spread vanilla layer:Thaw the vanilla ice cream for 15 to 20 minutes until spreadable. Remove the pan from the freezer and spread the vanilla ice cream evenly over the cookie crumb layer. Smooth the top, cover with plastic wrap, and freeze 4 to 6 hours or overnight to ensure the cake is thoroughly firm.Whip the frosting:Place a metal mixing bowl and beaters in the freezer for 30 minutes. Add 2 cups cold heavy cream, 1 1/4 cups powdered sugar, and 1 1/2 teaspoons clear vanilla flavoring. Beat on medium until sugar is incorporated, then high until stiff peaks form, about 3 to 4 minutes. Reserve 1 cup of the whipped topping in a piping bag fitted with a large star tip for decoration.Unmold and frost:Work quickly on a cool surface. Remove the cake from the freezer, open the springform, and use a large spatula to transfer the cake (on the plastic wrap) to a serving platter. Peel away plastic wrap, then frost the sides and top quickly with the remaining whipped topping, keeping the cake very cold to avoid melting.Decorate and freeze:Pipe a shell or swirl border with the reserved whipped topping about 1/2 inch above the top edge. Sprinkle colorful sprinkles evenly over the top if desired, then return the cake to the freezer until serving. Chill at least 30 minutes after decorating to set the piping.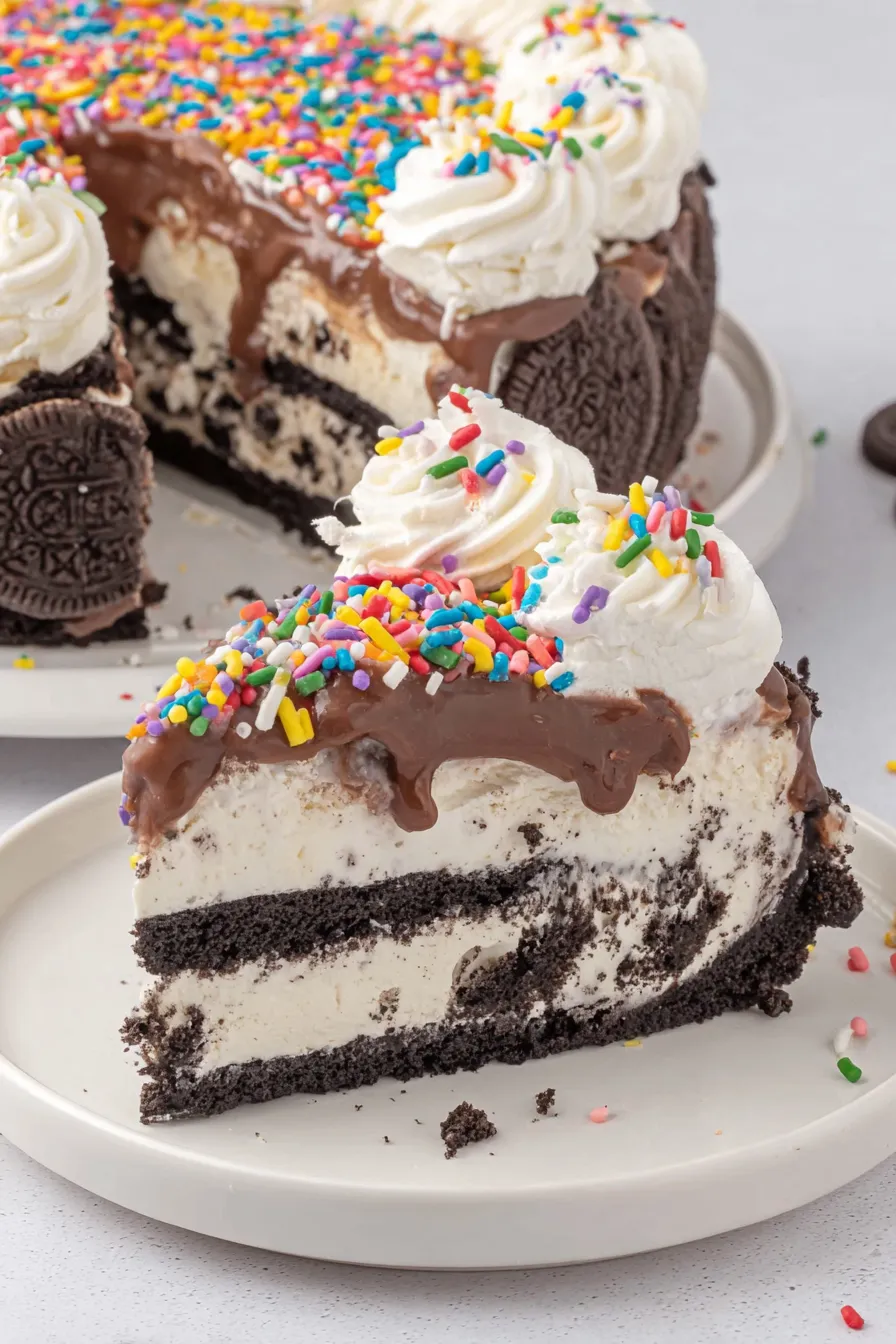
You Must Know
- Keep bowls and beaters very cold before whipping; this helps the heavy cream reach stiff peaks quickly for a stable frosting.
- Briefly baking the cookie crumbs sets them so they don’t become mushy between ice cream layers; cool them completely before layering.
- Thaw ice cream just until spreadable; over-thawing will cause pooling and under-thawing will tear the cake surface during spreading.
- The cake freezes well for up to three months when wrapped tightly; thaw in the refrigerator for 20 to 30 minutes before slicing for clean edges.
My favorite aspect of this dessert is how forgiving it is. Even with warm hands, you can correct small imperfections by keeping tools cold and working quickly. Family members always rave about the texture contrast, and it’s been a hit at holiday gatherings because it can be mostly assembled a day ahead. One friend who swore she didn’t like store-bought ice cream changed her mind after one bite and asked for a second slice. That reaction sums up why I keep this in my hosting rotation.
Storage Tips
Store the cake in the coldest part of the freezer, wrapped tightly in plastic wrap and then in a layer of aluminum foil or an airtight cake container to prevent freezer burn and flavor transfer. For best texture, consume within three months. When ready to serve, transfer to the refrigerator for 20 to 30 minutes to soften slightly for clean slices. If you need to keep individual slices, place wax or parchment between slices and store in an airtight container; they will maintain texture for about 2 weeks.
Ingredient Substitutions
For a gluten-free option, replace the chocolate sandwich cookies with a certified gluten-free chocolate wafer cookie and confirm the hot fudge is gluten-free. To reduce sugar slightly, use a no-sugar-added vanilla ice cream and a reduced-sugar hot fudge, keeping in mind sweetness balance. Swap salted butter for unsalted and add a pinch of flaky sea salt if preferred. For a dairy-free version, use plant-based ice creams and a stabilized dairy-free whipped topping; results will be slightly different in mouthfeel but still enjoyable.
Serving Suggestions
Slice with a hot, clean knife for neat portions: run the knife under hot water, dry, and slice in one smooth motion between peels. Serve with extra warm hot fudge on the side for drizzling, or add fresh berries for brightness. This cake pairs beautifully with coffee or a light dessert wine if serving adults. For children's parties, add themed sprinkles, or top with small candles for an instant centerpiece.
Cultural Background
The layered ice cream cake enjoyed at fast-food parlors and celebrations traces back to mid-20th-century American party culture, when convenience and spectacle were prized. The combination of crunchy cookie, layered ice cream, and whipped frosting is a distinctly American celebration format that emphasizes texture contrasts and convenience. Many regional variations exist—from sheet cakes with ice cream sandwiches to molded frozen entremets—reflecting how simple components yield festive, shareable desserts across gatherings.
Seasonal Adaptations
In summer, keep the cake simple and bright with lemon or mango sorbet in place of vanilla for a refreshing twist. For winter holidays, swap sprinkles for crushed peppermint and use chocolate mint ice cream for a festive edge. You can also fold toasted nuts or caramel swirls into the vanilla layer for autumnal depth. Temperature control during assembly becomes especially important in warm months—work in the coolest room available and chill tools between steps.
Meal Prep Tips
Most steps can be completed a day ahead: prepare and bake crumbs, chill them, spread the chocolate and fudge layers, and freeze. The vanilla layer can be added the day before serving, with final frosting and piping done within an hour of serving to ensure the whipped decoration is freshest. Label the wrapped cake with the date and use a platter that fits in your freezer so transfers are straightforward and safe.
This cake embodies the joy of recreating a nostalgic treat with approachable techniques. Share it with friends, relive birthday memories, or make it your new signature for summer gatherings—it's reliably impressive and deeply satisfying.
Pro Tips
Chill your mixing bowl and beaters for 30 minutes before whipping cream to help it reach stiff peaks quickly.
Thaw ice cream just until spreadable—about 15 to 20 minutes at room temperature—to avoid puddling between layers.
Heat hot fudge for 20 seconds to make it spreadable but not runny; let it cool 10 seconds before spreading over ice cream.
This nourishing copycat dairy queen ice cream cake recipe is sure to be a staple in your kitchen. Enjoy every moist, high protein slice — it is perfect for breakfast or as a wholesome snack any time.
FAQs about Recipes
How long does the cake need to freeze?
Freeze the cake for at least 4 hours or overnight for the best texture; thaw 20 to 30 minutes before slicing.
Can I make this gluten-free?
Yes. Use certified gluten-free sandwich cookies and check hot fudge ingredients to make a gluten-free version.
Tags
Copycat Dairy Queen Ice Cream Cake
This Copycat Dairy Queen Ice Cream Cake recipe makes perfectly juicy, tender, and flavorful steak every time! Serve with potatoes and a side salad for an unforgettable dinner in under 30 minutes.
Ingredients
Cookie Layer
Ice Cream Layers
Hot Fudge Layer
Whipped Cream Frosting
Instructions
Line the pan
Line a 9-inch springform pan with plastic wrap, leaving extra overhang to help lift the cake later.
Prepare and bake crumbs
Preheat oven to 350°F. Mix crushed cookies with melted butter, spread on a baking sheet, and bake for 7 to 8 minutes. Cool completely.
Soften chocolate ice cream
Let chocolate ice cream thaw 15 to 20 minutes until spreadable. Press into the bottom of the pan in an even layer and freeze 30 minutes to 1 hour.
Warm hot fudge
Microwave hot fudge for 20 to 25 seconds to loosen. Spread over the chilled chocolate ice cream layer with an offset spatula.
Add cookie crumbs and chill
Sprinkle baked cookie crumbs over the hot fudge, pressing lightly. Freeze for 1 hour so layers set.
Spread vanilla layer
Allow vanilla ice cream to soften 15 to 20 minutes, spread over crumbs, smooth the top, and freeze 4 to 6 hours or overnight.
Whip frosting
Chill a metal bowl and beaters. Whip heavy cream, powdered sugar, and clear vanilla to stiff peaks. Reserve 1 cup for piping.
Unmold and frost
Remove springform, transfer cake to a platter, peel off plastic wrap, and quickly frost the sides and top with whipped topping.
Decorate and freeze
Pipe a border using the reserved frosting, sprinkle with decorations if desired, then return the cake to the freezer until serving.
Last Step: Please leave a rating and comment letting us know how you liked this recipe! This helps our business to thrive and continue providing free, high-quality recipes for you.
Nutrition
Did You Make This?
Leave a comment & rating below or tag
@royalmorsel on social media!
Categories:
You might also like...

Cheeseburger Queso Sliders
Juicy beef, sweet-charred peppers, and a silky queso drizzle turn these sliders into the ultimate crowd-pleasing bite for game day or weeknight fun.

Short Ribs with Garlic Mash
Melt-in-your-mouth braised short ribs nestled over creamy garlic mashed potatoes, all in a rich, herb-scented sauce that feels like a warm hug.

Cheesy Garlic Pull-Apart Bread
Golden, garlicky pull-apart loaf swaddled in buttery herbs and stretchy mozzarella that begs to be shared warm from the oven.
Did You Make This?
Leave a comment & rating below or tag @royalmorsel on social media!
Rate This Recipe
Share This Recipe
Enjoyed this recipe? Share it with friends and family, and don't forget to leave a review!
Comments (1)
This recipe looks amazing! Can't wait to try it.
Comments are stored locally in your browser. Server comments are displayed alongside your local comments.

Hi, I'm Emma!
What's Popular

30-Minute Meals!
Join to receive our email series which contains a round-up of some of our quick and easy family favorite recipes.