
Christmas Red Velvet Poke Cake

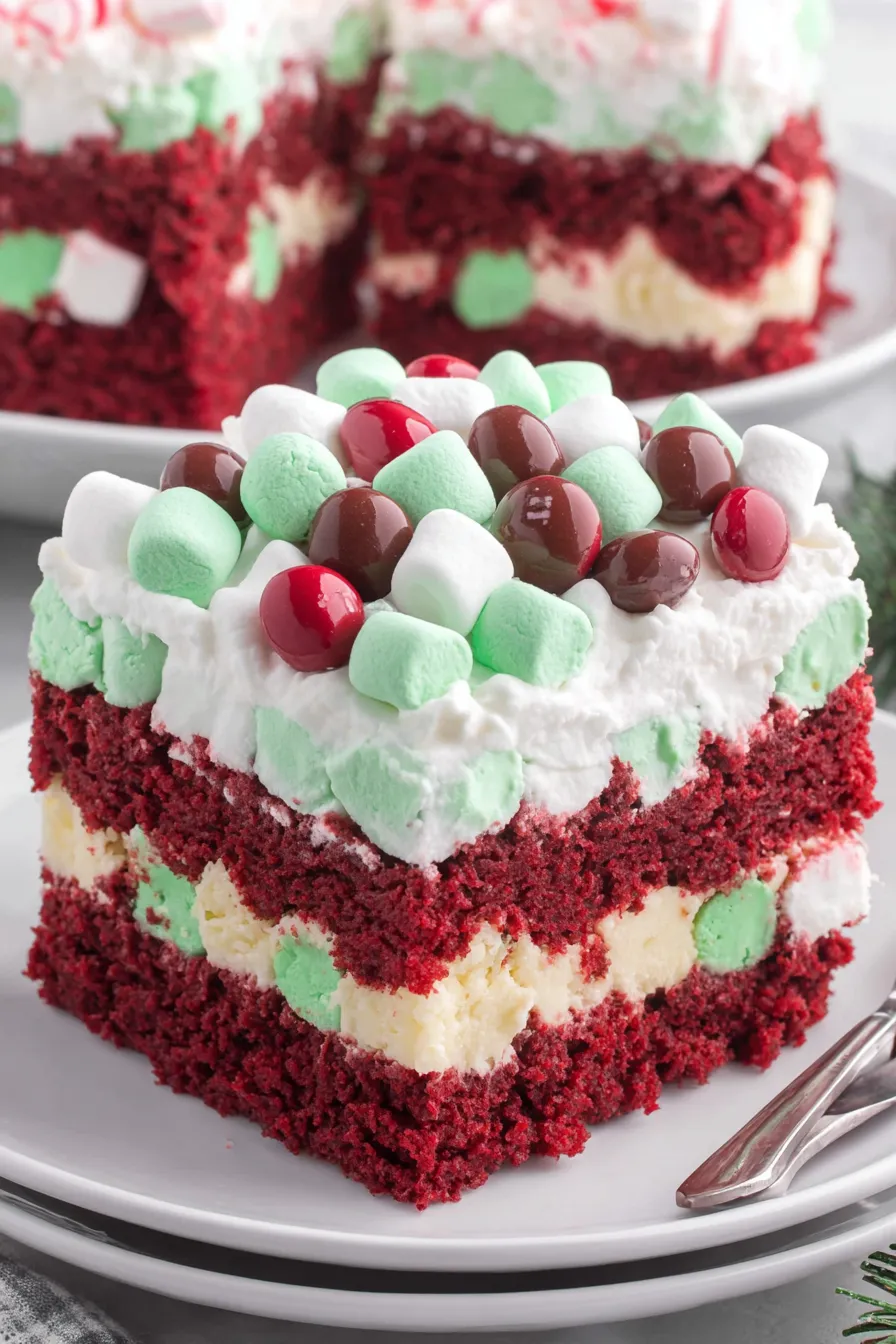
A festive, crowd-pleasing Red Velvet poke cake layered with cheesecake-flavored pudding, green-tinted whipped topping, mini marshmallows and red and green M&Ms — perfect for holiday celebrations.
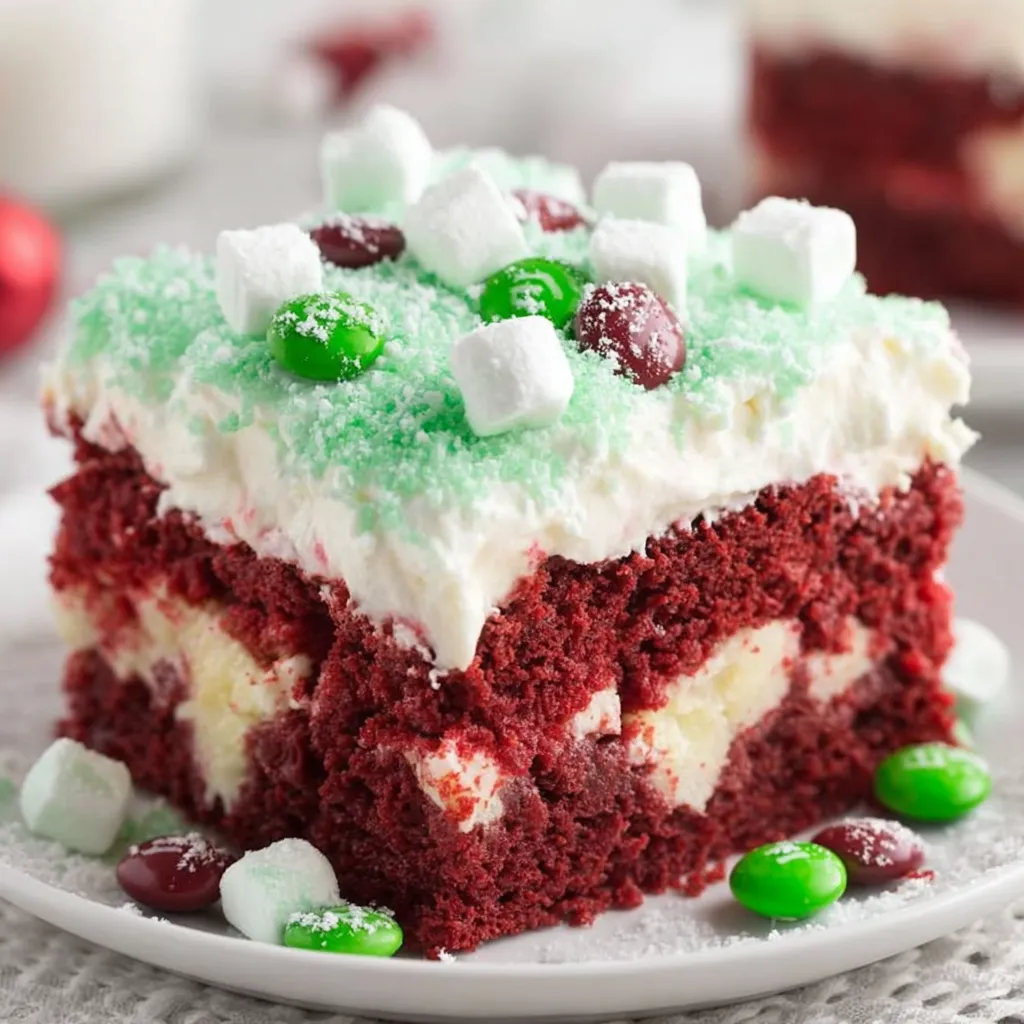
This Christmas Red Velvet Poke Cake is the kind of dessert that becomes a holiday tradition the first time you serve it. I discovered this version during a busy December when I wanted something that looked festive but didn’t require complicated piping or professional baking skills. The combination of a tender boxed red velvet base, cheesecake-flavored instant pudding seeping into the holes, and a cloud-like green-tinted whipped topping studded with mini marshmallows and M&Ms feels joyful and nostalgic. It’s bright, sweet, and full of contrasting textures — moist cake, silky pudding, and pillowy topping — and the red-and-green decoration always draws gasps around the dessert table.
I first made this for a family cookie swap, and everyone insisted I bring it to every gathering thereafter. The recipe’s ease is deceptive: simple steps yield a dessert that looks like you spent hours on it. It’s especially handy when you need to feed a crowd quickly — the cake bakes in about 25 minutes, requires only a few pantry staples, and chills while you wrap gifts or finish a roast. Serve chilled, cut into neat 3-inch squares, and enjoy watching kids and adults reach for seconds.
Why You'll Love This Recipe
- Ready mostly from pantry staples and a single boxed mix; ideal for busy holiday schedules and last-minute parties.
- Makes 12 generous squares — perfect for a family dessert or a potluck contribution where you need easy portioning.
- Poke method creates a pudding-soaked interior for a moist, tender crumb without additional syrups or soaking liquids.
- Decorations are customizable: mini marshmallows and red-and-green M&Ms make it festive and kid-friendly, and it’s quick to assemble.
- Can be prepared ahead: the cake needs 4 hours refrigeration, so make it in the morning and serve in the evening for stress-free entertaining.
- Visually impressive with minimal technique — green whipped topping and bright red cake deliver a classic Christmas color palette.
I’ve made this cake for potlucks, office parties, and my own small family celebrations. People always comment on the creamy cheesecake note from the instant pudding; it elevates the boxed cake into something that tastes homemade. My niece once insisted it looked like a snowy Christmas forest because of the marshmallows and green whipped topping — I’ll take that compliment any year.
Ingredients
- Red Velvet Cake Mix: One 15.25-ounce boxed red velvet mix makes the cake base reliable every time. I like using a well-known brand for consistent rise and color; avoid fat-free mixes because they change texture.
- Water: 1¼ cups of room-temperature water gives the proper hydration for a boxed mix. If your tap water is very cold, let it sit briefly so eggs incorporate smoothly.
- Vegetable Oil: ½ cup neutral vegetable oil keeps the crumb tender and moist; canola oil is an excellent swap if you prefer a milder flavor.
- Eggs: 3 large eggs bind the batter and help with structure. Use large eggs at room temperature for best volume.
- Cheesecake-Flavored Instant Pudding: 6.8 ounces (two 3.4-ounce packets) whisked with 3¾ cups cold whole milk produces a thick, creamy layer that sets into the poked holes and adds a decadent cheesecake note.
- Whipped Topping: 16 ounces thawed (two 8-ounce tubs) of thawed whipped topping forms a light, spreadable layer. Tinting it with green food coloring creates the holiday look.
- Green Food Coloring: 10–12 drops to achieve a soft minty-green without altering flavor; gel colorings are concentrated so use sparingly.
- Mini Marshmallows: 3 cups for a playful, snowy texture on top; these also help keep slices visually festive and kid-approved.
- Red and Green M&M's: ¼ cup each adds crunchy color accents; reserve a few for garnish if you want symmetrical decoration.
- Red Sprinkles: A light dusting adds sparkle and ties the color scheme together.
Instructions
Preheat and Prepare: Preheat the oven to 350°F. Grease a 9x13-inch baking pan with a baking spray that contains flour or with a thin layer of vegetable oil and a dusting of flour. Having a well-prepared pan prevents sticking and keeps the cake edges neat when cutting squares later. Make the Batter: In a medium mixing bowl, combine the red velvet cake mix with 1¼ cups water, ½ cup vegetable oil, and 3 large eggs. Use a handheld mixer on medium speed for about 1 to 1½ minutes until batter is smooth and no pockets of dry mix remain. Overmixing can create a denser crumb, so stop as soon as the batter is homogenous. Bake: Pour batter into the prepared 9x13 pan and smooth the top. Bake at 350°F for 25 minutes or until a toothpick inserted into the center comes out with a few moist crumbs. The cake will continue to set as it cools, so avoid overbaking to maintain a tender texture. Poke the Cake: After removing the cake from the oven, while still hot but not piping, use the rounded end of a wooden spoon (or the handle of a ladle) to poke holes about ½ inch apart over the entire surface. The holes should be deep but not all the way through to the pan. This creates channels for the pudding to sink in and flavor the cake throughout. Prepare the Pudding: In a medium bowl, whisk together 6.8 ounces cheesecake-flavored instant pudding mix with 3¾ cups cold whole milk for 1 to 1½ minutes until it begins to thicken. The pudding should be pourable but set to the touch in a few minutes; over-whisking can make it too stiff to seep into the holes. Assemble and Chill: Evenly pour the pudding over the hot, poked cake so it settles into the holes. Use a spatula to smooth the pudding lightly; don’t press too hard — you want the pudding to infiltrate the cake, not push it aside. Tightly cover the pan with plastic wrap and refrigerate for at least 4 hours to allow the pudding to set and the flavors to meld. Whip the Topping and Finish: After the cake has chilled, stir 10 to 12 drops of green food coloring into the 16 ounces of thawed whipped topping until the color is uniform. Spread the tinted topping evenly over the pudding layer. Sprinkle 3 cups mini marshmallows over the top, followed by ¼ cup red M&M’s, ¼ cup green M&M’s, and a scattering of red sprinkles. Chill briefly before cutting for cleaner slices. Serve: Cut into twelve 3-inch by 3-inch squares and serve chilled. Use a sharp knife wiped between cuts for the cleanest presentation.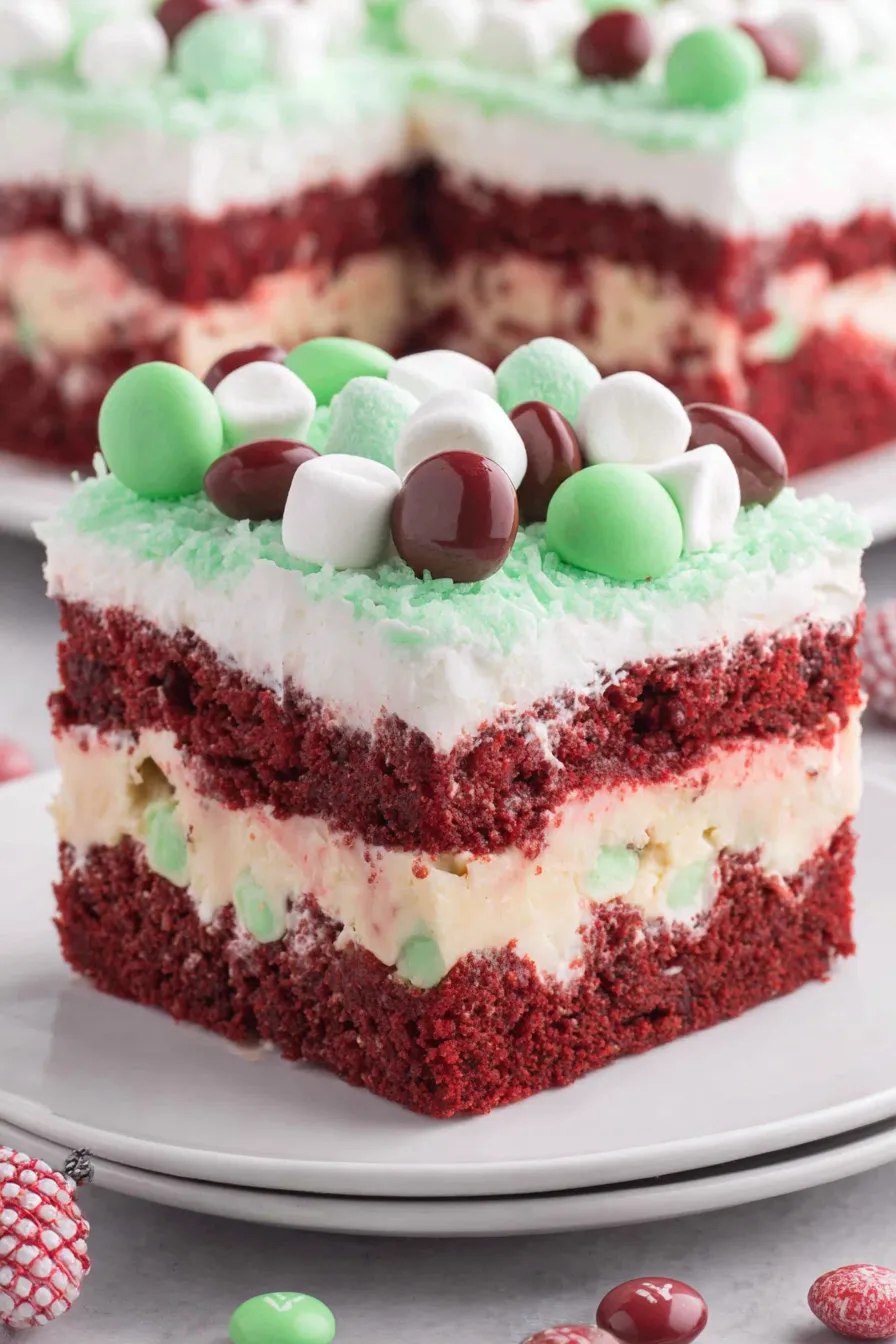
You Must Know
- This dessert is best served chilled and will keep in the refrigerator for up to 4 days when covered tightly to prevent moisture loss and flavor transfer.
- It freezes well for up to 3 months if wrapped tightly in plastic and then foil; thaw overnight in the refrigerator before serving to preserve texture.
- High in sugar and dairy: each serving is an indulgent holiday treat rather than a light option; expect a moderate-to-high calorie and carbohydrate count per square.
- Allergens include milk, eggs, and wheat — take care if serving guests with dietary restrictions and label accordingly.
- For the neatest slices, chill the cake thoroughly and use a hot, clean knife wiped between cuts.
My favorite part of this recipe is the contrast between the tangy cheesecake pudding and the sweet red velvet crumb; it lifts the flavor profile above a typical boxed cake. Family members often reach for seconds because the pudding-soaked interior keeps each bite moist and surprisingly elegant for such a simple preparation. It’s a dessert that looks like a special occasion centerpiece yet comes together with minimal stress.
Storage Tips
Store the cake covered in the refrigerator for up to four days in an airtight container or covered tightly with plastic wrap to prevent drying and absorption of other fridge odors. If you need to store individual portions, place parchment between slices to prevent sticking and freeze single squares on a tray until solid before wrapping them in plastic and foil—this prevents freezer burn and keeps decoration intact. Reheat gently at room temperature for 20–30 minutes or thaw in the refrigerator overnight before serving. Avoid leaving the dessert at room temperature for extended periods because the pudding and whipped topping contain dairy and should remain chilled for food safety.
Ingredient Substitutions
If you prefer a slightly lighter topping, substitute half of the whipped topping with a stabilized whipped cream made from 1 cup heavy cream whipped with 1 tablespoon confectioners’ sugar and 1 teaspoon vanilla; fold into the thawed topping to maintain volume. For a dairy-free version, use dairy-free whipped topping and a dairy-free instant pudding alternative, and substitute whole milk with an unsweetened almond or oat milk formulated for pudding mixes — results will vary in creaminess. To reduce sweetness slightly, opt for a low-sugar boxed mix if available and use semi-sweet chocolate chips as a garnish instead of extra candy.
Serving Suggestions
Serve squares on a decorative platter with a small dusting of extra red sprinkles or a single peppermint candy on top for a more holiday-forward look. This cake pairs nicely with unsweetened coffee or a dark roast to balance the richness, and it also complements mulled wine or spiced cider during winter gatherings. For an adult twist, offer a small drizzle of espresso liqueur or chocolate sauce at the table. Keep napkins and dessert forks handy — the pudding-soaked center is decadent and delightful.
Cultural Background
Red velvet cake has roots in Southern United States baking and gained celebrity status in the 20th century thanks to famous hotels and bakers who emphasized its distinctive red color and velvety crumb. The poke technique — creating holes and filling them with pudding or gelatin — is a practical American home-cooking method that emerged as a way to add flavor and moisture to boxed cakes. This mash-up combines nostalgic vintage flavors with modern convenience, resulting in a holiday-friendly dessert that nods to tradition while embracing speed and simplicity.
Seasonal Adaptations
For different holidays, swap the color palette: tint the whipped topping pink for Valentine’s Day or pale blue for a winter baby shower. In summer, garnish with fresh berries and a lemon-flavored instant pudding to lighten the profile. For Thanksgiving, switch to a caramel or brown sugar-flavored pudding and top with chopped toasted pecans and a pinch of sea salt. Adjust decorations to seasonal themes without changing the core assembly for versatile celebrations year-round.
Meal Prep Tips
Plan to make the cake in the morning or the night before — the 4-hour chilling time is ideal for prepping ahead. Keep the topping and decorations separate until you’re ready to serve if you want the marshmallows and M&Ms to stay crisp. Transport the cake in its pan covered with a fitted lid or tightly wrapped in plastic for potlucks. If cutting for packed lunches, place single squares in disposable containers with parchment to keep them intact.
This Christmas Red Velvet Poke Cake is a shortcut to festive success: beautiful enough for holiday guests, easy enough for a busy host, and flexible enough to adapt to many occasions. Try it once and you’ll likely find it on repeat each season.
Pro Tips
Use room-temperature eggs and liquids to help the batter mix evenly and produce a tender crumb.
Poke holes while the cake is still warm so the pudding penetrates deeply rather than sitting on top.
Chill the assembled cake for at least 4 hours for the best texture and cleaner slices.
This nourishing christmas red velvet poke cake recipe is sure to be a staple in your kitchen. Enjoy every moist, high protein slice — it is perfect for breakfast or as a wholesome snack any time.
Tags
Christmas Red Velvet Poke Cake
This Christmas Red Velvet Poke Cake recipe makes perfectly juicy, tender, and flavorful steak every time! Serve with potatoes and a side salad for an unforgettable dinner in under 30 minutes.
Ingredients
Red Velvet Cake
Cheesecake-Flavored Instant Pudding
Whipped Topping and Decoration
Instructions
Preheat and prepare pan
Preheat oven to 350°F and grease a 9x13-inch pan thoroughly with baking spray or a light oil and flour dusting to prevent sticking.
Mix batter
Combine 15.25-ounce boxed red velvet mix with 1¼ cups water, ½ cup vegetable oil, and 3 large eggs. Beat on medium with a handheld mixer until smooth, about 1 to 1½ minutes.
Bake the cake
Pour batter into prepared pan and bake at 350°F for 25 minutes or until a toothpick shows a few moist crumbs. Allow to cool slightly before poking.
Poke holes
Using the rounded end of a wooden spoon, poke holes about ½ inch apart over the cake surface to create channels for the pudding to seep into.
Prepare pudding
Whisk 6.8 ounces cheesecake-flavored pudding mix into 3¾ cups cold whole milk for 1 to 1½ minutes until it begins to thicken but is still pourable.
Pour pudding and chill
Evenly pour the pudding over the hot, poked cake and use a spatula to smooth gently. Cover tightly and refrigerate for at least 4 hours to set.
Tint and spread topping
Stir 10–12 drops green food coloring into 16 ounces thawed whipped topping until uniform. Spread over chilled pudding layer.
Decorate and serve
Sprinkle mini marshmallows, red and green M&M's, and red sprinkles evenly. Cut into twelve 3-inch by 3-inch squares and serve chilled.
Last Step: Please leave a rating and comment letting us know how you liked this recipe! This helps our business to thrive and continue providing free, high-quality recipes for you.
Nutrition
Did You Make This?
Leave a comment & rating below or tag
@royalmorsel on social media!
Categories:
You might also like...

Cheeseburger Queso Sliders
Juicy beef, sweet-charred peppers, and a silky queso drizzle turn these sliders into the ultimate crowd-pleasing bite for game day or weeknight fun.

Short Ribs with Garlic Mash
Melt-in-your-mouth braised short ribs nestled over creamy garlic mashed potatoes, all in a rich, herb-scented sauce that feels like a warm hug.

Cheesy Garlic Pull-Apart Bread
Golden, garlicky pull-apart loaf swaddled in buttery herbs and stretchy mozzarella that begs to be shared warm from the oven.
Did You Make This?
Leave a comment & rating below or tag @royalmorsel on social media!
Rate This Recipe
Share This Recipe
Enjoyed this recipe? Share it with friends and family, and don't forget to leave a review!
Comments (1)
This recipe looks amazing! Can't wait to try it.
Comments are stored locally in your browser. Server comments are displayed alongside your local comments.

Hi, I'm Emma!
What's Popular

30-Minute Meals!
Join to receive our email series which contains a round-up of some of our quick and easy family favorite recipes.