
Christmas Chocolate Rice Krispie Balls

Bite-sized holiday treats: peanut butter Rice Krispie balls dipped in chocolate and finished with festive sprinkles. Easy, make-ahead, and loved by kids and adults alike.
This recipe for Christmas Chocolate Rice Krispie Balls began as a quick holiday shortcut and has become a seasonal favorite in my family. I first put these together during a hectic December when I needed a no-fuss treat for a neighborhood cookie exchange. The combination of crunchy cereal, creamy peanut butter, and a glossy chocolate coating created a perfect contrast of textures and flavors that felt both nostalgic and festive. The first batch disappeared before the party even started, and each year since, these bite-sized confections earn a place on our holiday tray.
The texture is what keeps people coming back: a tender, slightly chewy interior made creamy by peanut butter, encased in a snap of tempered chocolate that keeps the sprinkles in place. They are easy to adapt for allergies or flavor preferences, and they travel well, which makes them ideal for gifting to neighbors or packing in a thermos for holiday road trips. Between the chocolate sheen and the colorful sprinkles, they look like tiny ornaments, and arranging them on a platter always draws compliments.
Why You'll Love This Recipe
- Quick assembly with pantry staples: ready in about 30 minutes from start to finish, perfect for last-minute gatherings.
- Kid-friendly and hands-on: little helpers can roll balls and add sprinkles, turning prep into a festive activity.
- Make-ahead friendly: they keep in the refrigerator for days and freeze well for longer storage.
- Flexible flavor profile: swap chocolate for white or use flavored peanut butter to vary the taste.
- Portable and giftable: sturdy enough to pack in boxes or tins without losing shape.
- Budget-friendly: uses simple, affordable ingredients yet looks special and seasonal.
Over the years I’ve learned small tricks that make a big difference, like chilling the mixture briefly so the balls are easier to roll and adding a touch of melted butter to balance the peanut butter’s density. My relatives request these every year; last Christmas my niece wrapped a dozen in parchment and ribbon and declared them the official family treat. They’re simple, but they feel celebratory.
Ingredients
- 3 cups Rice Krispies cereal: Use the classic variety for the best crunch. If you need gluten-free, select a certified gluten-free puffed rice cereal; brands vary, so check the label.
- 1/2 cup creamy peanut butter: Creamy works best for binding. I like natural peanut butter for flavor, but a standard jarred brand gives a more consistent texture.
- 1/2 cup powdered sugar: Adds sweetness and helps the mixture hold together; sift if clumpy for a smoother blend.
- 1/4 cup unsalted butter, melted: Adds richness and softens the peanut butter; melt and cool slightly before mixing.
- 1 teaspoon vanilla extract: A small amount elevates the overall flavor; use pure vanilla for the cleanest taste.
- 1 cup semi-sweet or milk chocolate chips: Choose semi-sweet for less sweetness or milk chocolate for a creamier coating. Ghirardelli and Nestle are reliable options.
- 1 tablespoon coconut oil (optional): Helps achieve a smoother, glossier melted chocolate that sets with a pleasant sheen.
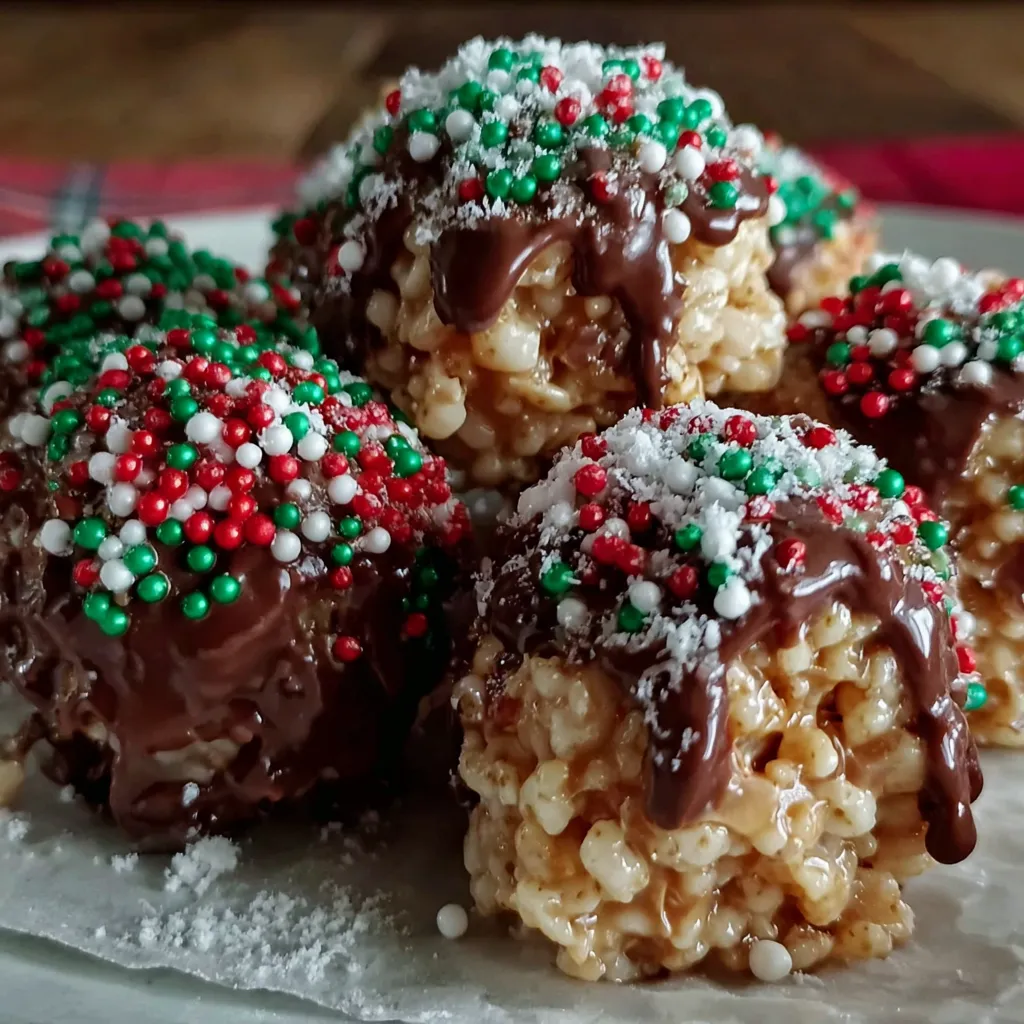
- Holiday sprinkles: Red, green, white, or mixed. Use sturdy jimmies rather than delicate nonpareils to avoid color bleeding.
Instructions
Mix the base:In a large mixing bowl combine 3 cups Rice Krispies, 1/2 cup creamy peanut butter, 1/2 cup powdered sugar, 1/4 cup melted unsalted butter, and 1 teaspoon vanilla extract. Use a sturdy spatula to fold the mixture until thoroughly combined. The goal is a homogeneous mass that holds together when pressed; if it feels too dry, add a teaspoon of melted butter or peanut butter. Work quickly so the cereal retains some crunch.Form the balls:Scoop small portions of about 1 tablespoon each and roll between your palms into 1-inch balls. If the mixture sticks to your hands, lightly oil your palms or briefly chill the mixture for 10 minutes to firm it up. Place formed balls on a parchment-lined baking sheet spaced about 1/2 inch apart. Chilling the tray for 10 to 15 minutes helps maintain shape during dipping.Melt the chocolate:Place 1 cup chocolate chips and 1 tablespoon coconut oil, if using, in a microwave-safe bowl. Heat in 30-second intervals, stirring thoroughly between each interval until smooth. Keep the chocolate warm but not hot; overheating can seize chocolate. Alternatively, melt over a double boiler on low heat while stirring constantly.Dip and decorate:Use a fork to lower each ball into the melted chocolate, turning to coat completely. Lift and tap the fork on the bowl edge so excess chocolate drips back. Return the coated ball to parchment and immediately sprinkle with holiday sprinkles before the chocolate sets. Work quickly in small batches so the chocolate remains fluid.Set and chill:Once all balls are coated and decorated, refrigerate the tray for at least 30 minutes or until the chocolate is firm. Transfer to an airtight container and keep chilled until serving. Allow a few minutes at room temperature before serving for the best texture.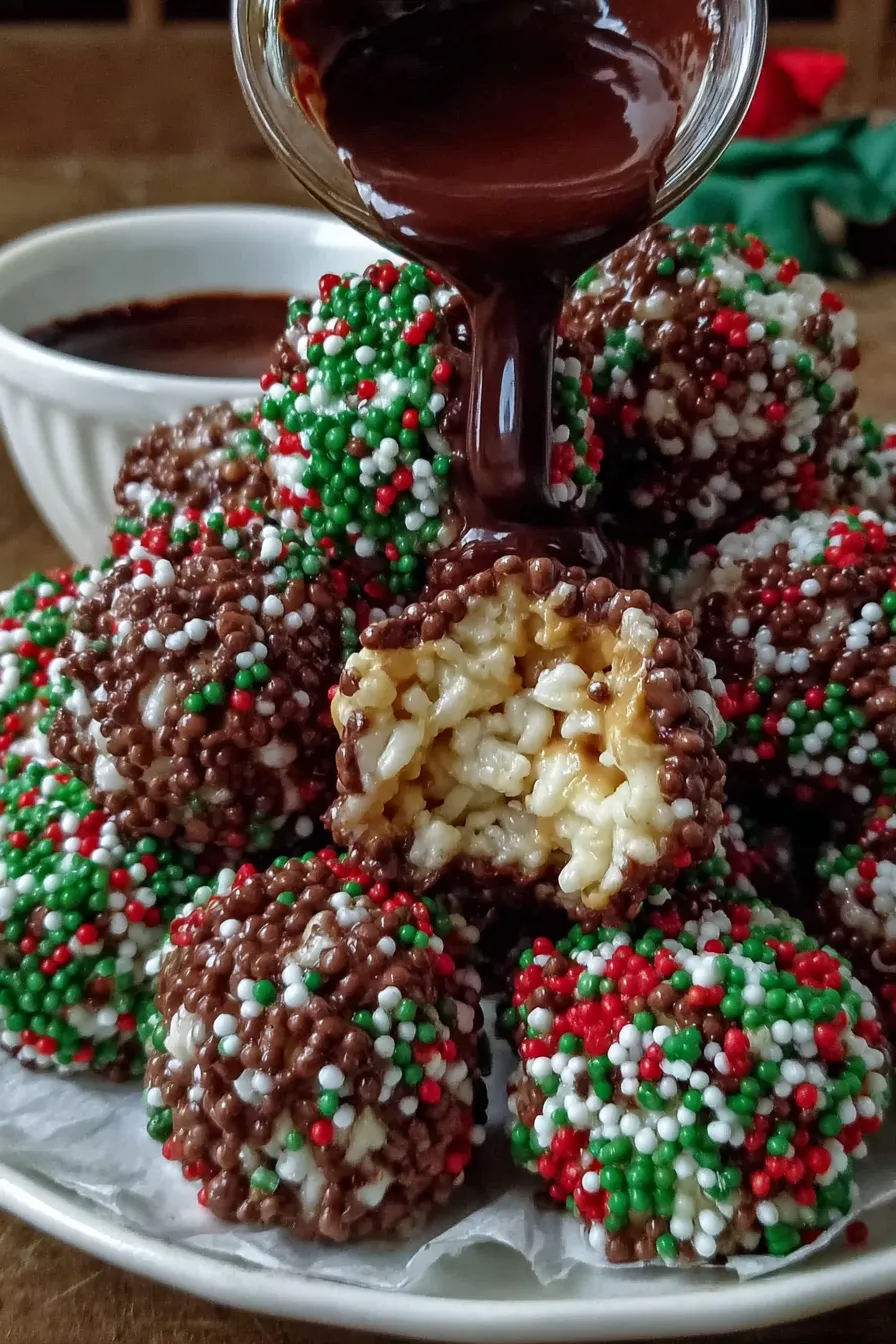
You Must Know
- Store in an airtight container in the refrigerator for up to 7 days; freeze for up to 3 months on a single layer then transfer to a freezer bag.
- These are moderately high in calories and provide quick energy; a typical bite-sized ball contains around 140 calories depending on chocolate choice.
- For gluten-free needs, choose certified gluten-free puffed rice and check all labels for cross-contact warnings.
- Peanut butter and chocolate pair well, but nut-free butters can be used for allergy-friendly versions; texture will vary.
My favorite part of making these is the ritual of dipping and decorating. Each year my aunt and I set up a little assembly line—one rolls, one coats, one sprinkles—and we end up chatting about the past twelve months while making enough for the entire block to sample. The sprinkles always bring out memories of cookie swaps and school holiday parties, and seeing the platter leave with neighbors never gets old.

Storage Tips
Place cooled, set pieces in a single layer in an airtight container separated by parchment to prevent sticking. Refrigerate for up to one week; before serving, let sit at room temperature for 5 to 10 minutes for the chocolate to soften slightly. For longer storage, freeze on a sheet pan until solid, then transfer to a freezer-safe bag for up to three months. Thaw in the refrigerator overnight to avoid condensation forming on the chocolate surface. Avoid warm spots in transit; insulated boxes with a small ice pack help during holiday deliveries.
Ingredient Substitutions
If you need a nut-free version, swap the peanut butter for sunflower seed butter at a 1:1 ratio; the flavor will be earthier but the texture remains similar. To make a dairy-free treat, use vegan chocolate chips and a plant-based buttery spread. For a lighter-sweet profile, use dark chocolate chips and reduce powdered sugar by 1 tablespoon. If you prefer extra chew, add 1/4 cup mini marshmallows into the cereal mix; they melt slightly and create a softer interior.
Serving Suggestions
Arrange the bites on a platter with greenery or holly sprigs for a holiday display. They pair beautifully with hot cocoa or mulled cider; for a grown-up pairing, offer them alongside a fortified dessert wine like tawny port. Garnish with a dusting of powdered sugar or a drizzle of contrasting white chocolate for an elegant touch. They make charming edible favors when wrapped in clear cello with a ribbon.
Cultural Background
Rice Krispie treats and variations have long been part of American holiday baking, evolving from a simple marshmallow bar into countless creative versions. Coating puffed cereal clusters in chocolate and decorating them with seasonal colors is a contemporary twist that borrows from European confectionery practices of enrobing and glazing sweets. The festive sprinkles and handheld size reflect the tradition of communal sharing during winter celebrations where small, portable treats are favored.
Seasonal Adaptations
In winter, use red and green sprinkles and cinnamon-infused peanut butter for a warm spice note. For autumn, swap sprinkles for chopped toasted pecans and use maple-flavored peanut butter. In spring, switch to pastel sprinkles and white chocolate coating. For Valentine’s Day, add a pinch of cayenne to the chocolate for a subtle warmth that contrasts nicely with the sweet cereal center.
Meal Prep Tips
Make a double batch and freeze half for later holiday events. Form the balls and freeze on a sheet pan, then bag them for future use. When you plan to serve, thaw in the refrigerator, dip in warm chocolate, and chill to set. This saves time on party days and keeps the treats tasting freshly made. Prepare the chocolate just before dipping to maintain the glossy finish.
These little confections are a celebration in themselves and a reminder that simple ingredients can produce something memorable. Enjoy them with good company, and feel free to make the flavors your own.
Pro Tips
Chill the mixture for 10 minutes if it is too sticky to form neat balls; this firms the fat and makes rolling easier.
Work in small batches when dipping so the chocolate stays warm and fluid for a smooth coating.
Lightly oil your hands with a neutral oil to prevent sticking while rolling the balls.
Use coconut oil in the melted chocolate for a glossier finish that sets with a pleasant snap.
Press sprinkles onto the chocolate immediately after coating to ensure they adhere before the chocolate sets.
This nourishing christmas chocolate rice krispie balls recipe is sure to be a staple in your kitchen. Enjoy every moist, high protein slice — it is perfect for breakfast or as a wholesome snack any time.
FAQs about Recipes
Can I make these ahead and freeze them?
Yes. You can freeze the uncoated balls on a sheet pan until solid and then transfer to a freezer bag for up to three months. Thaw overnight in the refrigerator before dipping or serving.
What is the best way to melt the chocolate?
Use a microwave-safe bowl and heat chocolate in 30-second intervals, stirring between each, until smooth. Avoid overheating to prevent seizing.
Tags
Christmas Chocolate Rice Krispie Balls
This Christmas Chocolate Rice Krispie Balls recipe makes perfectly juicy, tender, and flavorful steak every time! Serve with potatoes and a side salad for an unforgettable dinner in under 30 minutes.
Ingredients
Base
Coating and decoration
Instructions
Combine ingredients
In a large bowl mix 3 cups Rice Krispies, 1/2 cup creamy peanut butter, 1/2 cup powdered sugar, 1/4 cup melted unsalted butter, and 1 teaspoon vanilla until the mixture holds together when pressed.
Form balls
Scoop about 1 tablespoon portions and roll into 1-inch balls. If sticky, chill the mixture for 10 minutes or lightly oil your palms. Place on parchment-lined sheet.
Melt chocolate
Melt 1 cup chocolate chips with 1 tablespoon coconut oil in 30-second microwave intervals, stirring between each until smooth, or melt gently over a double boiler.
Dip and decorate
Dip each ball into melted chocolate using a fork to coat completely. Let excess drip off, return to parchment, and add sprinkles immediately before the chocolate sets.
Chill to set
Refrigerate for at least 30 minutes or until chocolate hardens. Store in an airtight container in the fridge for up to 7 days or freeze for longer storage.
Last Step: Please leave a rating and comment letting us know how you liked this recipe! This helps our business to thrive and continue providing free, high-quality recipes for you.
Nutrition
Did You Make This?
Leave a comment & rating below or tag
@royalmorsel on social media!
Categories:
You might also like...

Cheeseburger Queso Sliders
Juicy beef, sweet-charred peppers, and a silky queso drizzle turn these sliders into the ultimate crowd-pleasing bite for game day or weeknight fun.

Short Ribs with Garlic Mash
Melt-in-your-mouth braised short ribs nestled over creamy garlic mashed potatoes, all in a rich, herb-scented sauce that feels like a warm hug.

Cheesy Garlic Pull-Apart Bread
Golden, garlicky pull-apart loaf swaddled in buttery herbs and stretchy mozzarella that begs to be shared warm from the oven.
Did You Make This?
Leave a comment & rating below or tag @royalmorsel on social media!
Rate This Recipe
Share This Recipe
Enjoyed this recipe? Share it with friends and family, and don't forget to leave a review!
Comments (1)
This recipe looks amazing! Can't wait to try it.
Comments are stored locally in your browser. Server comments are displayed alongside your local comments.

Hi, I'm Emma!
What's Popular

30-Minute Meals!
Join to receive our email series which contains a round-up of some of our quick and easy family favorite recipes.