
Chocolate Pretzel Trees

Crisp mini pretzels drizzled with glossy almond bark and topped with colorful sprinkles — a quick, festive no-bake treat perfect for gatherings and holiday fun.
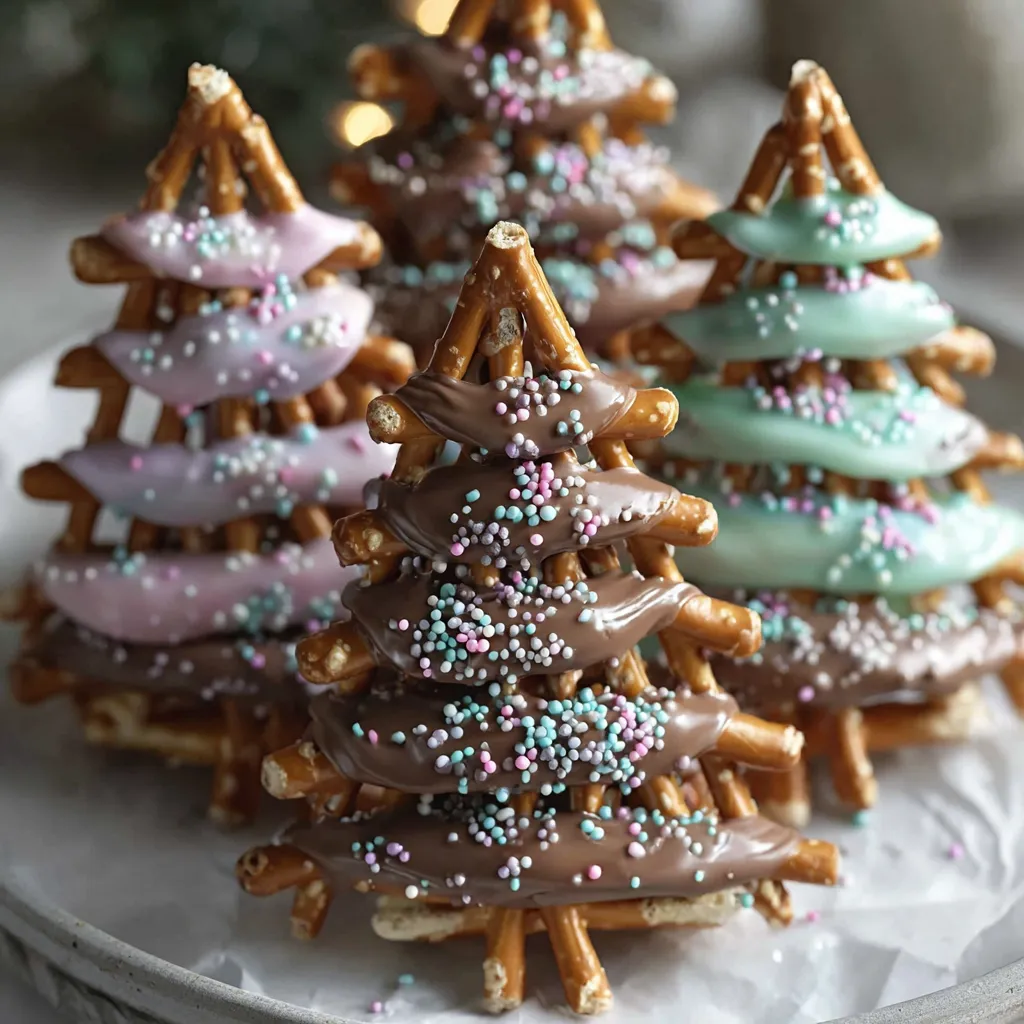
This recipe for Chocolate Pretzel Trees has been one of my favorite quick, festive projects for years. I first made them during a frantic holiday cookie swap when I needed a no-bake treat that looked special but could be made in less than an hour. The contrast of the crunchy mini pretzel sticks with the smooth, glossy almond bark and bright sprinkles always gets compliments. These were an instant hit at that party — everyone loved the salty-sweet combination and the tiny, tree-shaped presentation made them irresistible to both kids and adults.
I keep a bag of candy melts in the pantry specifically for moments like this. The technique is simple, but small details — like arranging the pretzels so they interlock and melting the coating slowly so it stays glossy — make a big difference. These little trees are perfect for last-minute treats, classroom snacks, or a whimsical platter at holiday gatherings. They are portable, fun to decorate with kids, and they travel well. I often make a double batch because they disappear faster than you'd expect.
Why You'll Love This Recipe
- Ready in under 30 minutes from start to finish: quick microwave melting and simple assembly make these perfect for last-minute entertaining.
- Uses pantry staples you likely already have: almond bark or candy melts and mini pretzels — add sprinkles and you’re done.
- No-bake and kid-friendly: safe for little helpers to participate in the drizzle and decorating steps.
- Customizable and visually impressive: change coating color, sprinkle types, or assembly size to suit any theme or holiday.
- Great for make-ahead gifting: they set firm and hold shape, so you can stack them in boxes for party favors.
- Crowd-pleasing salt-and-sweet contrast: the crunch of pretzels balances the rich coating for a memorable bite.
My family’s reaction the first time I made these was priceless — my niece declared them the “best Christmas forest” and insisted each tree needed a different color of sprinkles. Over the years I've refined the drizzle technique and found that a small piping corner on a zip-top bag gives the cleanest control. These trees are my quick decorative trick when I want a homemade-looking treat with minimal effort.
Ingredients
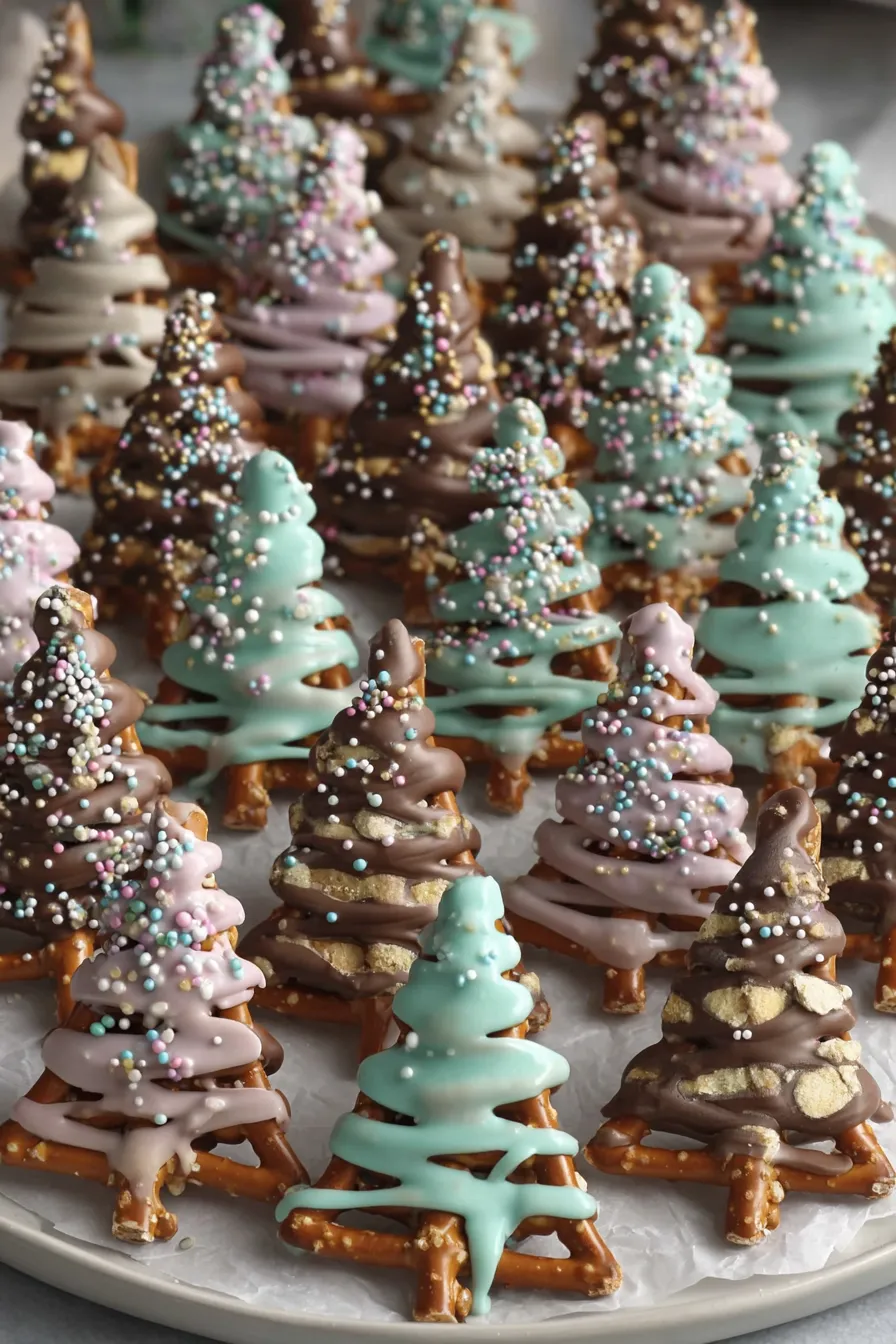
- 24 oz Almond bark or candy melts: Use a high-quality brand such as Wilton or Mercken's for consistent melting and a glossy finish. Choose green candy melts if you want colored trees, or white almond bark for classic chocolate coating. The 24-ounce package yields about 18 medium trees.
- 108 Mini pretzel sticks: Look for uniform, straight mini sticks — Snyder's or Rold Gold make reliable mini pretzels. Even straightness helps the pieces lie flat and interlock into a neat tree shape.
- Sprinkles (any variety you like): Small nonpareils, sugar pearls, or festive confetti work best. Choose tiny shapes so they sit nicely on the chocolate without weighing it down.
Instructions
Arrange the pretzel bases: Line a baking sheet with wax paper. On the paper, lay out sets of six mini pretzel sticks in an arrow or triangular formation to suggest a tree shape: start with a single stick for the top point, then layer 2, 3, and finally 4 sticks for a fuller base if you want larger trees. Keep the pieces close — about 1–2 mm between sticks — so the chocolate will bridge the gaps and hold the structure without pooling excessively. For consistent trees, work row by row and space the trees evenly on the sheet. Melt the coating: Break or chop the almond bark/candy melts into even pieces and place in a microwave-safe bowl. Microwave on high for 30 seconds, then stir thoroughly. Continue in 15-second bursts, stirring between each, until fully melted and glossy. The total time is typically 60–90 seconds depending on your microwave. Avoid overheating; if you see steam or the mixture becomes grainy, lower the power and stir gently to bring it back together. You want a pourable but not runny consistency. Prepare the piping bag: Spoon the melted coating into a quart-size zip-top bag. Press the chocolate to one corner and seal the bag. Cut a very small tip off the corner — start with a 3–4 mm hole and adjust if you need a broader flow. A tiny hole gives precise zigzag lines; a slightly larger one makes faster coverage. You can also use a piping bag with a small round tip if you prefer. Drizzle the chocolate: Holding the bag about 2–3 inches above the pretzel formation, start at the top and move down in a controlled zigzag to mimic the branches of a tree. Aim for even coverage — you want enough coating to act as glue between sticks but not so much that the tree loses its airiness. If you miss a spot, go back with a small dab. For colored layers, allow the first layer to set slightly (2–3 minutes) and then add accents with a different color. Decorate and set: Immediately scatter sprinkles over the wet coating so they adhere before the chocolate firms. Use tweezers for delicate sugar pearls to position them like ornaments. Let the sheet sit at room temperature for about 20 minutes, or place it in the refrigerator for 8–10 minutes to speed up setting. Once firm to the touch, peel the trees from the wax paper carefully, handling by the base to avoid smudges.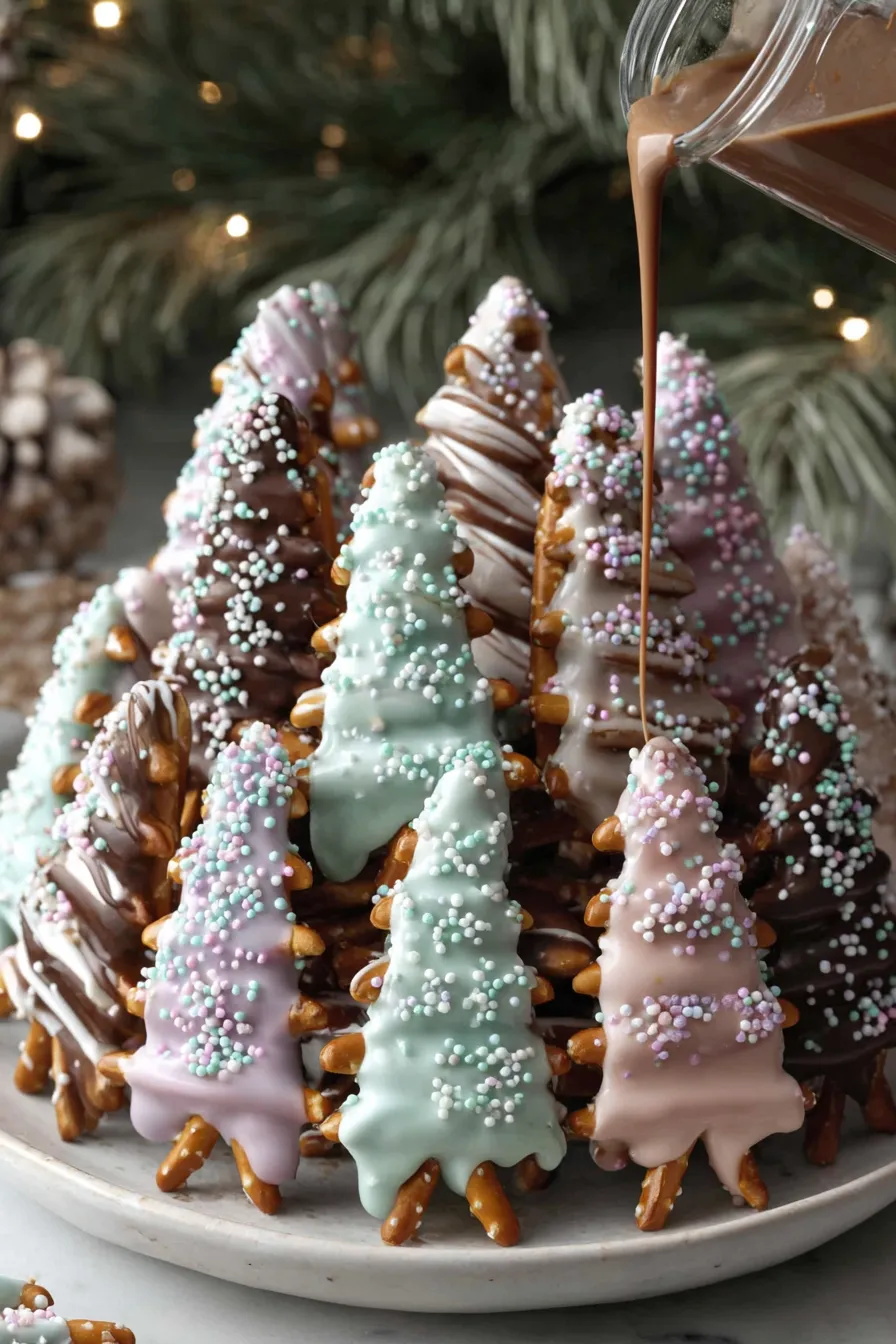
You Must Know
- High in flavor but simple to store: these hold for up to 4 days at room temperature in an airtight container or up to 2 weeks refrigerated; freeze for up to 3 months tightly wrapped.
- Allergen note: pretzels contain gluten and some coatings may contain milk or traces of tree nuts — check labels if serving to guests with allergies.
- Set time: room-temperature setting takes ~20 minutes; refrigeration speeds it to 8–10 minutes but can dull sheen slightly.
- Use shallow layers: too much melted coating will obscure the pretzel texture and make the treat overly sweet.
My favorite aspect of this project is how customizable it is. One year I made a rainbow set with colored melts and tiny star sprinkles for a birthday, and the simple change in color transformed the whole mood. Another time, I used metallic sugar pearls for a New Year’s platter — they felt fancy but required no extra effort. These small details make the treats feel thoughtfully made even when you’re short on time.
Storage Tips
Store finished trees in a single layer in an airtight container to preserve their glossy finish and crisp texture. If stacking is necessary, place parchment or wax paper between layers. Room temperature storage is fine in cool environments for up to 4 days; in warm kitchens refrigerate to keep the coating from softening, but bring to room temperature before serving to restore flavor. For long-term storage, freeze in a single layer on a tray until solid, then transfer to a freezer-safe bag; thaw at room temperature for 20–30 minutes before serving.
Ingredient Substitutions
If you don’t have almond bark, use white chocolate chips with 1 teaspoon of vegetable shortening per cup to smooth melting. For dairy-free or vegan versions, seek out plant-based candy melts or dairy-free coating brands. Pretzel variations include mini twists or homemade broken pretzel sticks; just ensure pieces are roughly the same size for uniform assembly. Swap sprinkles for tiny chopped nuts or crushed peppermint for a seasonal twist — keep in mind these will change texture and allergen profile.
Serving Suggestions
Arrange the trees on a platter with edible 'snow' — sifted powdered sugar — or place them in mini kraft boxes for favors. They pair beautifully with hot cocoa or mulled cider for holiday gatherings. For a dessert buffet, mix tree sizes and colors to create a visual forest. A bed of shredded coconut or green-dyed shredded coconut can turn a tray into an instant winter scene.
Cultural Background
While not a traditional confection tied to a single cuisine, these chocolate-covered pretzel trees draw inspiration from European chocolate-dipped biscuit traditions and the modern American penchant for playful, themed holiday treats. The salt-and-sweet contrast echoes classic chocolate-coated pretzel popularity, adopted into seasonal shapes that make them popular at community bake sales and classroom exchanges across the United States.
Seasonal Adaptations
For winter holidays, use green melts and red sugar pearls; for Valentine’s Day, select pink and red coatings with heart sprinkles. Summer variations could feature pastel colors and citrus-flavored coatings. For Halloween, use black and orange melts with spooky confetti. Changing the color palette and sprinkle shapes lets you adapt the same base technique to any season or celebration.
Meal Prep Tips
Make the coating and pre-cut your piping bags ahead of time for quick assembly when guests arrive. If preparing for a large party, set up an assembly line with one person piping, another sprinkling, and a third placing trees on trays for cooling. This assembly process keeps you organized and reduces waiting time. Label boxes if gifting so recipients know storage recommendations and allergen notes.
In short, these chocolate pretzel trees are a delightful, low-effort way to bring festive cheer to any gathering. They’re fast to make, easy to customize, and always evoke a smile — try a batch and make them your own with colors and decorations that reflect your celebrations.
Pro Tips
Cut a very small hole in the piping bag corner at first; you can always widen it if needed to avoid over-drizzling.
Keep pretzels uniform in size to ensure even coverage and consistent tree shapes.
If the melted coating thickens while working, microwave for 10–15 seconds and stir to restore pourability.
Work on wax paper or silicone mats for easy release and cleanup.
Use tweezers to place delicate sugar pearls precisely so they look like ornaments.
This nourishing chocolate pretzel trees recipe is sure to be a staple in your kitchen. Enjoy every moist, high protein slice — it is perfect for breakfast or as a wholesome snack any time.
FAQs about Recipes
Can I speed up the setting process?
Yes — almond bark and candy melts set at room temperature. Refrigerate for about 8–10 minutes to speed setting, but avoid long refrigeration if you want a glossy finish.
How do I make them dairy-free or vegan?
Use labeled dairy-free candy melts or white melting wafers designated vegan. Always check the ingredient list for milk derivatives.
Tags
Chocolate Pretzel Trees
This Chocolate Pretzel Trees recipe makes perfectly juicy, tender, and flavorful steak every time! Serve with potatoes and a side salad for an unforgettable dinner in under 30 minutes.
Instructions
Arrange the pretzel bases
Line a baking sheet with wax paper and arrange mini pretzel sticks in triangular/tree shapes, keeping pieces close so the melted coating can bridge gaps and hold the structure.
Melt the coating
Microwave chopped almond bark or candy melts on high for 30 seconds, stir, then continue in 15-second intervals until fully melted and glossy. Avoid overheating.
Prepare a piping bag
Spoon the melted coating into a zip-top bag, press down to one corner, seal, and cut a small tip. Start with a 3–4 mm opening for controlled drizzling.
Drizzle the chocolate
Hold the bag 2–3 inches above the pretzel shapes and drizzle from top to bottom in a zigzag motion, covering joints so the pieces adhere but don’t become fully encased.
Decorate and set
Immediately add sprinkles so they stick to the coating. Allow to set at room temperature for about 20 minutes or refrigerate for 8–10 minutes until firm; then carefully remove from wax paper.
Last Step: Please leave a rating and comment letting us know how you liked this recipe! This helps our business to thrive and continue providing free, high-quality recipes for you.
Nutrition
Did You Make This?
Leave a comment & rating below or tag
@royalmorsel on social media!
Categories:
You might also like...

Cheeseburger Queso Sliders
Juicy beef, sweet-charred peppers, and a silky queso drizzle turn these sliders into the ultimate crowd-pleasing bite for game day or weeknight fun.

Short Ribs with Garlic Mash
Melt-in-your-mouth braised short ribs nestled over creamy garlic mashed potatoes, all in a rich, herb-scented sauce that feels like a warm hug.

Cheesy Garlic Pull-Apart Bread
Golden, garlicky pull-apart loaf swaddled in buttery herbs and stretchy mozzarella that begs to be shared warm from the oven.
Did You Make This?
Leave a comment & rating below or tag @royalmorsel on social media!
Rate This Recipe
Share This Recipe
Enjoyed this recipe? Share it with friends and family, and don't forget to leave a review!
Comments (1)
This recipe looks amazing! Can't wait to try it.
Comments are stored locally in your browser. Server comments are displayed alongside your local comments.

Hi, I'm Emma!
What's Popular

30-Minute Meals!
Join to receive our email series which contains a round-up of some of our quick and easy family favorite recipes.