
>>

A luscious no-bake chocolate cherry pie with a creamy cherry-cream cheese filling, a chocolate crust, and an irresistible swirl of Cool Whip and mini chocolate chips.
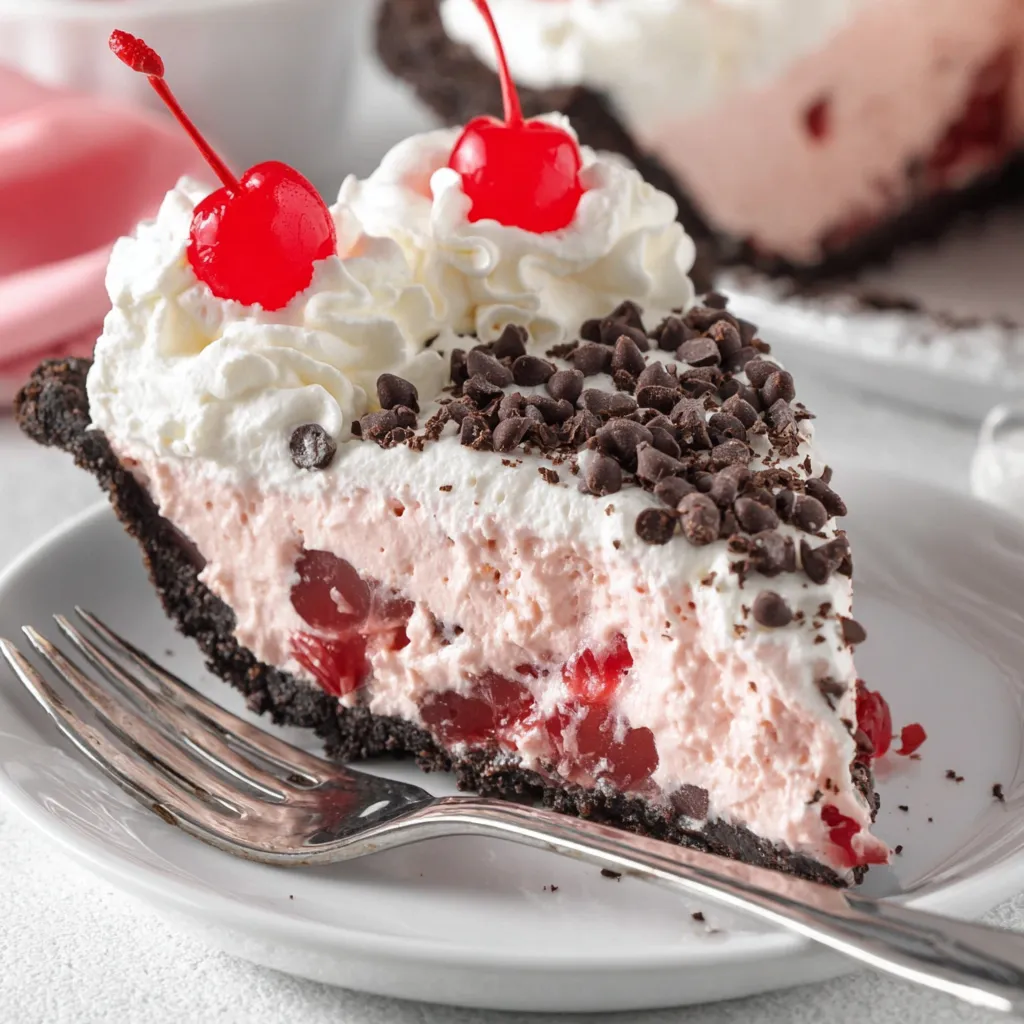
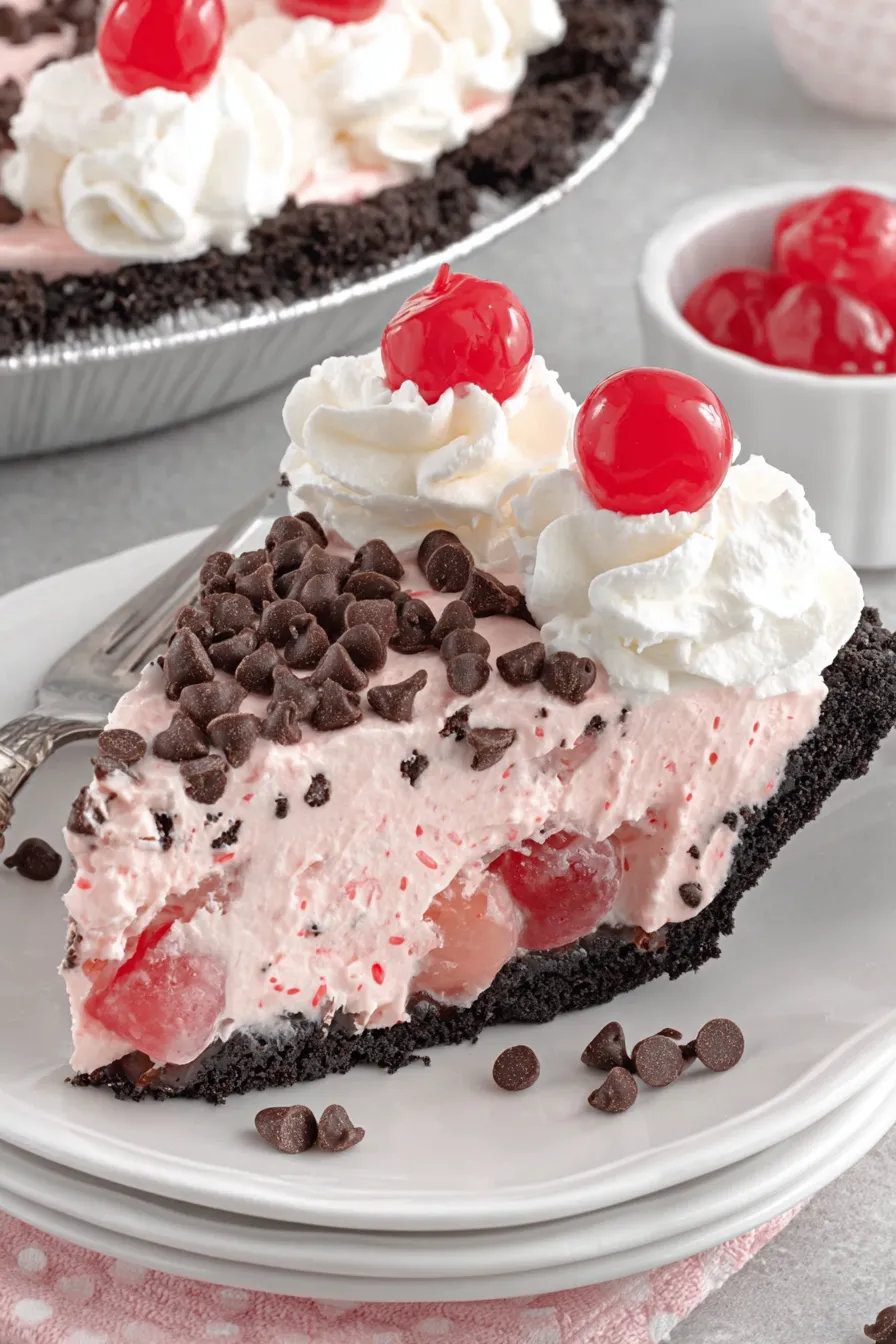
This Chocolate Cherry Pie is a celebration of contrasts: bright, jammy cherries folded into a light, creamy sweetened cream cheese base, all cradled in a deep chocolate crust. I first made this after finding a forgotten can of cherry pie filling in the pantry on a busy holiday week; I wanted something quick, elegant, and totally indulgent that required no oven time. The result was an immediate hit at our table—the bright cherry pockets against the smooth, slightly tangy filling and little bursts of semi-sweet chocolate make every forkful feel special.
What makes this recipe a keeper is its simplicity and the way it scales for gatherings. It sets in the fridge rather than baking, so you can assemble it ahead and spend less time in the kitchen and more time with guests. I often bring this pie to potlucks and holidays; people always ask for the recipe and then proudly tell me how they switched up the decorations or added a boozy twist. The texture is creamy but stable, the crust adds a gentle chocolate crunch, and the cherry filling cuts the sweetness with a pleasant fruit tang.
Every time I bring this pie to a family dinner, someone mentions how it tastes like a grown-up sundae. My children love picking the maraschino cherries from the top, and my mother immediately asks for the recipe because she loves desserts that can be made ahead. Discovering this combination felt serendipitous—an easy pantry rescue that became a staple whenever I want something that reads elegant but is completely achievable.

My favorite part is how this pie looks when you cut it: the ruby cherries against pale pink-streaked filling and dark crust create a dramatic cross-section. At family gatherings, I often decorate with extra cherries and a few shaved chocolate curls; the visual contrast always prompts compliments before the first bite. It’s a dessert that looks like effort but comes together with minimal fuss.
Store the pie covered in the refrigerator for up to 4 days; a pie dome or airtight container prevents the crust from absorbing fridge odors. For longer storage, wrap the pie tightly in plastic wrap and aluminum foil and freeze for up to 2 months. When reheating is desired, remove from freezer and thaw in the refrigerator overnight. Avoid leaving the pie at room temperature for extended periods—the Cool Whip and cream cheese will soften, changing texture and making slices less clean.
If you prefer a lighter topping, substitute freshly whipped heavy cream (1 cup heavy cream whipped with 2 tablespoons confectioners' sugar) for the Cool Whip—whip to soft peaks before folding. For a dairy-free version, use a dairy-free cream cheese and coconut-based whipped topping and a gluten-free crust if needed. To make it boozy, fold 1 tablespoon of cherry liqueur into the cherry filling. Replacing the chocolate crust with a graham cracker crust will create a milder chocolate-to-cherry ratio.
Serve slices chilled with an extra dollop of whipped topping and a maraschino cherry on top. For an elegant touch, add a dusting of cocoa powder or a few chocolate shavings at the last moment. Pair with espresso or a fortified wine like Moscato d'Asti for dessert wines, or serve alongside vanilla bean ice cream for a classic hot-cold contrast. This pie shines at summer barbecues, holiday dinners, and as the finale of a romantic dinner.
The combination of cherries and chocolate has roots in European confectionery—think Black Forest influences where cherries and chocolate are a celebrated pairing. American no-bake pies and refrigerated desserts evolved as busy households sought simple, make-ahead sweets, and this pie bridges that tradition with the modern convenience of pre-made ingredients. It’s a contemporary take on classic flavor pairings, adapted for home cooks who appreciate both speed and sophistication.
In summer, swap canned filling for macerated fresh cherries with a touch of sugar and lemon juice for brightness. For winter holidays, add a pinch of cinnamon and a splash of brandy to the filling, and use candied orange peel as a garnish for warmth. For Valentine’s Day, decorate with heart-shaped chocolate shavings and use maraschino cherries with stems for a nostalgic touch.
Make the filling up to two days ahead and store in an airtight container in the fridge; fill the crust when guests arrive and decorate just before serving. If transporting, chill the assembled pie until firm, then keep in a cooler with ice packs to prevent melting. Pre-portion slices into individual jars or cups for grab-and-go dessert servings at events—these travel well and look charming when topped with a single cherry.
Every time I make this pie, it reminds me that the best desserts are often those that let good ingredients shine without fuss. It’s a dish that invites improvisation—add nuts, change the chips, or use fresh fruit—and still delivers a crowd-pleasing finish. Make it your own and enjoy the smiles it brings around the table.
Let cream cheese come to room temperature to avoid lumps and ensure a smooth filling.
Reserve some mini chips for the top to keep the garnish looking fresh and prevent sinking.
Chill the pie at least 3 hours; overnight chilling yields cleaner slices and deeper flavor melding.
Use mini chocolate chips for even distribution throughout the filling and a consistent bite.
This nourishing chocolate cherry pie recipe is sure to be a staple in your kitchen. Enjoy every moist, high protein slice — it is perfect for breakfast or as a wholesome snack any time.
This Chocolate Cherry Pie recipe makes perfectly juicy, tender, and flavorful steak every time! Serve with potatoes and a side salad for an unforgettable dinner in under 30 minutes.
Place 8 ounces of room-temperature cream cheese in a medium mixing bowl and beat on medium speed until smooth and lump-free, about 1 to 2 minutes.
Sift and add 1 cup powdered sugar gradually while mixing on low, then increase speed and beat until light and creamy, another 1 to 2 minutes.
Use a spatula to stir in the entire 21-ounce can of cherry pie filling until cherries are evenly dispersed without breaking them down.
Gently fold 8 ounces of thawed Cool Whip into the cherry-cream cheese mixture to keep the filling airy and stable.
Fold in 1 cup of mini chocolate chips so they are evenly distributed throughout the filling; reserve remaining chips for garnish.
Spread the filling into the 9-inch chocolate crust, smooth the top, cover, and refrigerate for 3 to 4 hours or until fully set. Decorate with additional Cool Whip, mini chips, and maraschino cherries before serving.
Last Step: Please leave a rating and comment letting us know how you liked this recipe! This helps our business to thrive and continue providing free, high-quality recipes for you.
Leave a comment & rating below or tag
@royalmorsel on social media!

Juicy beef, sweet-charred peppers, and a silky queso drizzle turn these sliders into the ultimate crowd-pleasing bite for game day or weeknight fun.

Melt-in-your-mouth braised short ribs nestled over creamy garlic mashed potatoes, all in a rich, herb-scented sauce that feels like a warm hug.

Golden, garlicky pull-apart loaf swaddled in buttery herbs and stretchy mozzarella that begs to be shared warm from the oven.
Leave a comment & rating below or tag @royalmorsel on social media!
Enjoyed this recipe? Share it with friends and family, and don't forget to leave a review!
This recipe looks amazing! Can't wait to try it.
Comments are stored locally in your browser. Server comments are displayed alongside your local comments.

Join to receive our email series which contains a round-up of some of our quick and easy family favorite recipes.
