
Candy Cane Peppermint Cupcakes

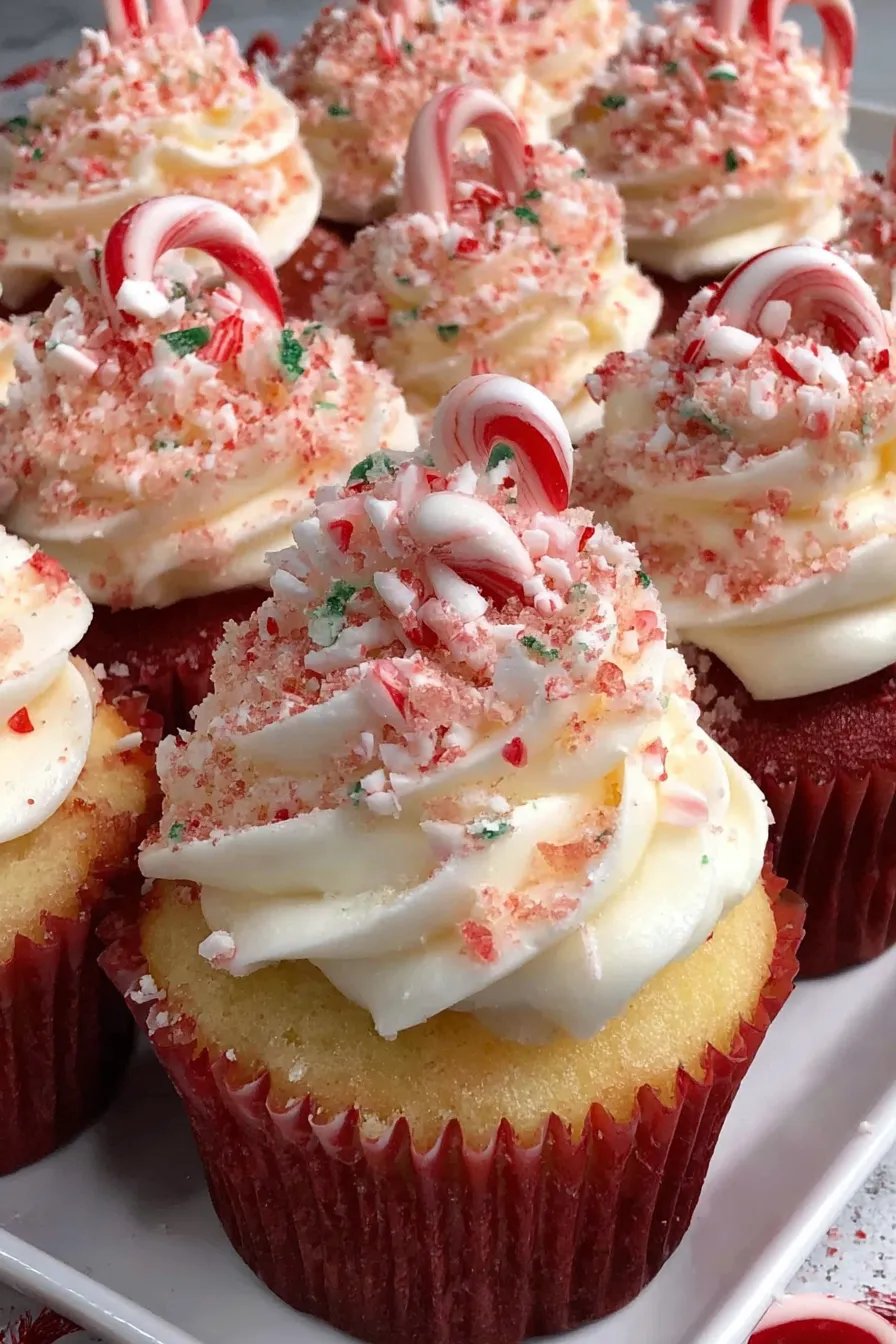
Festive red-and-white cupcakes with a tender vanilla crumb and bright peppermint buttercream—perfect for holiday gatherings and cookie swaps.

This recipe began as a simple holiday experiment and turned into a seasonal staple at our house. I first tried combining bright peppermint with swirls of red-and-white cake batter one December when I wanted something more playful than plain cupcakes for a family cookie exchange. The texture is tender and fine-grained from a white cake mix, while the homemade peppermint buttercream brings an old-fashioned cool, minty finish that everyone recognizes and loves. They look like tiny candy canes and taste like the holidays—sweet, minty, and a little nostalgic.
What I love about these cupcakes is how approachable they are: a boxed mix keeps the batter consistent and forgiving, while a straightforward buttercream elevates the whole thing. I started using these at holiday breakfasts and discovered that neighbors and friends treat a tray of these as an invitation to linger. The peppermint cut through the richness of the buttercream in just the right way, and the alternating white and red batter inside makes each bite a happy surprise. If you’re hosting a party or want an easy, yet impressive, holiday bake, this is one to bookmark.
Why You'll Love This Recipe
- Quick to pull together using one standard 15.25-ounce white cake mix combined with pantry staples, saving time without sacrificing flavor.
- Visually festive: red-and-white marbled cupcakes inside and out—perfect for gift boxes, cookie swaps, or a holiday centerpiece.
- Frosting is rich but balanced with pure peppermint extract; it pipes beautifully and holds shape for decorating ahead of time.
- Make-ahead friendly: cupcakes and frosting can be prepared a day in advance and assembled the day of serving to save time.
- Flexible for dietary tweaks: swap butter for dairy-free spread and heavy cream for a plant-based option to suit dietary needs.
- Designed for crowd-pleasing portioning: this yields 18 standard cupcakes—ideal for mid-size gatherings without excessive leftovers.
We discovered that piping a thin stripe of red gel inside the bag before filling creates the candy-cane swirl on the frosting—an easy trick that makes homemade feel professional. Family and friends always comment on the look before they take the first bite, and kids especially love the tiny candy cane toppers.
Ingredients
- White cake mix: Use one standard 15.25-ounce box of white cake mix with the required ingredients listed on the package. I prefer a brand with a fine crumb and not overly sweet—Pillsbury or Duncan Hines both work well.
- Red gel food coloring: Gel produces a vibrant color without thinning the batter. Add a little at a time until you reach your preferred shade of red.
- Unsalted butter: 1 1/2 cups (12 ounces) softened to room temperature. Using unsalted lets you control the seasoning; if using salted, omit the added kosher salt in the frosting.
- Kosher salt: 1/2 teaspoon for the frosting. This balances the sweetness and brightens the peppermint flavor.
- Confectioners’ sugar: About 2 7/8 cups (roughly 345 grams) sifted for a silky frosting texture and easier whipping.
- Heavy cream: 2 tablespoons to loosen the frosting and give it a glossy mouthfeel; you can substitute whole milk for a slightly lighter finish.
- Vanilla extract: 1 teaspoon of pure vanilla to round out the flavor and provide warmth behind the peppermint.
- Peppermint extract: 1/2 teaspoon for a clear, cooling peppermint note—use pure extract, as imitation can taste medicinal.
- Decorations: Mini candy canes or coarse red-and-white peppermint sugar as needed for topping and festive texture.
Instructions
Prep the oven and tins: Place oven racks in the upper and lower thirds and preheat to 350°F. Line eighteen standard cupcake cups across two 12-cup muffin tins with paper liners so you have them ready as soon as the batter is mixed. Having two tins helps rotate for even baking. Make the batter: Prepare the cake batter according to the package directions using the specified eggs, oil, and water (or milk) that the mix calls for. Once the batter is smooth, divide it evenly into two bowls. The total volume per liner should be about 3 to 4 tablespoons of each color when alternating layers. Color one half: Add red gel food coloring to one bowl of batter, stirring until color is consistent. Start with a small amount and increase until you reach a vivid red; gel coloring is concentrated so a little goes a long way. Fill the liners: Alternate spooning small portions of white and red batter into each liner until they are about half full—roughly 1 1/2 to 2 tablespoons of batter per color per liner, totaling about 1/4 cup per cupcake. This alternating method creates a marbled, candy-stripe interior when baked. Bake and test: Bake for 18 to 20 minutes, rotating the tins halfway through baking for even browning. Insert a toothpick into the center; it should come out clean or with a few moist crumbs. Avoid overbaking to keep cakes tender. Cool completely: Transfer cupcakes to a wire rack and let them cool completely before frosting—at least 30 minutes. Frosting warm cupcakes will cause melting and loss of shape. Whip the buttercream: Beat 1 1/2 cups (12 ounces) room-temperature unsalted butter with 1/2 teaspoon kosher salt on medium speed until creamy, about 2 minutes. Add the sifted confectioners’ sugar in two additions, beating thoroughly after each. Mix in 2 tablespoons heavy cream, 1 teaspoon vanilla, and 1/2 teaspoon peppermint extract, then beat on medium-high for 2 minutes until light and fluffy. Prepare piping bag: Using a small brush or a long skewer, paint two thin lines of red gel food coloring inside a piping bag fitted with a round tip approximately 1/2-inch (1.27 cm). This creates a candy-cane stripe on the finished swirl. Fill the bag with frosting and pipe onto cooled cupcakes. Decorate: Top each frosted cupcake with a mini candy cane or sprinkle coarse peppermint sugar while the frosting is still tacky so it adheres. Store in a single layer at room temperature for up to 24 hours or refrigerate up to 3 days.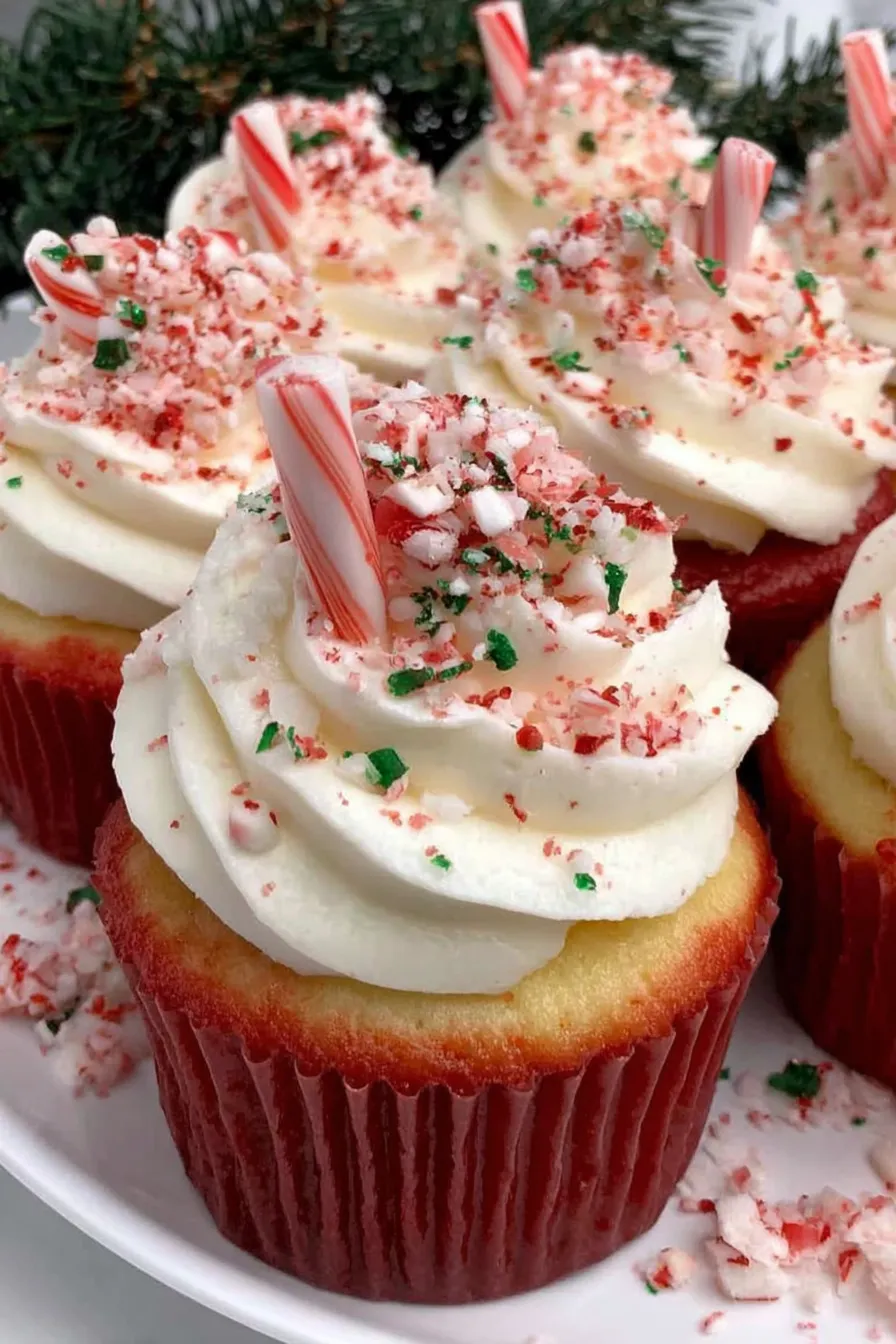
You Must Know
- These keep well in an airtight container in the refrigerator for up to three days; bring to room temperature before serving to restore texture.
- They freeze well: un-frosted cupcakes can be frozen up to three months; thaw overnight in the fridge and frost within 24 hours of thawing.
- High in sugar and butter—each cupcake is indulgent and best enjoyed as an occasional treat at holiday gatherings.
- Use pure peppermint extract sparingly—too much can create a medicinal taste; 1/2 teaspoon balances the buttercream for most palates.
I always make a test cupcake when trying a new color intensity or piping technique—one quick sample assesses balance and presentation. Neighbors have asked for these as gifts, and I now keep extras of the mini candy canes and peppermint sugar in my holiday baking drawer to finish a batch quickly.
Storage Tips
For short-term storage, keep cupcakes in a single layer in an airtight container at room temperature away from heat sources for up to 24 hours. For longer storage, refrigerate in a sealed container up to three days; remove from the fridge 30 to 60 minutes before serving to let the buttercream soften. If you need to freeze, freeze unfrosted cupcakes on a tray until solid, then transfer to a freezer bag for up to three months. Thaw in the refrigerator overnight and bring to room temperature before frosting to avoid condensation on the crumb.
Ingredient Substitutions
To make these dairy-free, substitute a plant-based butter suitable for baking and use a non-dairy heavy cream alternative such as canned coconut cream—note this may add a slight coconut note. For a lower-sugar frosting, reduce confectioners’ sugar by 1/2 cup and increase cream slightly while whipping for structure; texture will be softer. If you prefer natural colorings, blend beet powder for red, but the shade will be more muted compared to gel coloring.
Serving Suggestions
Serve on a white platter with a scattering of crushed candy cane around the base for a festive look. These pair beautifully with hot chocolate or a dark roast coffee to balance the sweetness. For holiday brunch, present with mini fruit skewers to add a fresh contrast of acidity. Garnish with a small sprig of fresh mint for color contrast when serving to adult guests.
Cultural Background
The candy cane is a holiday symbol with origins traced to 17th-century Europe, evolving into the red-and-white striped peppermint stick popular in North America. These cupcakes marry that visual tradition with classic American box-mix convenience, blending nostalgic candy-cane flavors into a modern, shareable bakery-style treat that’s both festive and familiar.
Seasonal Adaptations
For a winter party, add a teaspoon of cocoa to the red batter for a subtle chocolate hint and deeper color contrast. In summer, tone down the peppermint to create a light mint cupcake that pairs well with fresh summer berries. At cookie exchanges, pipe smaller rosettes and use crushed peppermint for an elegant, bite-sized option.
Meal Prep Tips
Make the batter and bake two days ahead, store unfrosted cupcakes tightly covered in the fridge, and whip the buttercream on the day of serving for freshest texture. Alternatively, prepare the buttercream a day ahead, store it in the fridge, and re-whip briefly before piping to restore stiffness. Use disposable piping bags to save cleanup time when making multiple batches.
These cupcakes are an easy way to bring holiday cheer without spending hours in the kitchen. The combination of a reliable boxed base and a flavorful homemade buttercream makes them a repeatable crowd-pleaser—give the red stripe trick a try and make them your own this season.
Pro Tips
Always cool cupcakes completely before frosting to prevent melting and sliding of buttercream.
Paint thin lines of gel inside the piping bag for a candy-cane stripe effect on the frosting.
Sift confectioners’ sugar before adding to avoid lumps in the buttercream.
Use gel food coloring for intense color without changing batter consistency.
Test-bake one cupcake to check color intensity and frosting balance before finishing the batch.
This nourishing candy cane peppermint cupcakes recipe is sure to be a staple in your kitchen. Enjoy every moist, high protein slice — it is perfect for breakfast or as a wholesome snack any time.
Tags
Candy Cane Peppermint Cupcakes
This Candy Cane Peppermint Cupcakes recipe makes perfectly juicy, tender, and flavorful steak every time! Serve with potatoes and a side salad for an unforgettable dinner in under 30 minutes.
Ingredients
Cupcakes
Frosting
Decoration
Instructions
Preheat and prepare tins
Preheat oven to 350°F and place racks in the upper and lower thirds. Line 18 cupcake cups in two standard 12-cup muffin tins with paper liners.
Prepare batter
Make the cake batter according to the box directions. Divide batter evenly into two bowls to color half red and leave half white.
Color batter
Add red gel food coloring to one bowl, stirring until the desired shade is reached. Use a small amount at first; gel is concentrated.
Fill liners
Alternate spooning white and red batter into liners until they are about half full (approximately 3 to 4 tablespoons total per liner).
Bake
Bake for 18 to 20 minutes, rotating tins halfway through. Test with a toothpick; it should come out clean or with a few crumbs.
Cool
Let cupcakes cool completely on a wire rack before frosting to prevent melting and loss of shape.
Make buttercream
Beat softened butter and salt until creamy. Add sifted confectioners’ sugar in two additions, then heavy cream, vanilla, and peppermint extract. Beat until light and fluffy, about 2 minutes on medium-high.
Pipe and decorate
Paint thin stripes of red gel inside a piping bag fitted with a 1/2-inch round tip, fill with frosting, pipe onto cooled cupcakes, and top with mini candy canes or peppermint sugar.
Last Step: Please leave a rating and comment letting us know how you liked this recipe! This helps our business to thrive and continue providing free, high-quality recipes for you.
Nutrition
Did You Make This?
Leave a comment & rating below or tag
@royalmorsel on social media!
Categories:
You might also like...

Cheeseburger Queso Sliders
Juicy beef, sweet-charred peppers, and a silky queso drizzle turn these sliders into the ultimate crowd-pleasing bite for game day or weeknight fun.

Short Ribs with Garlic Mash
Melt-in-your-mouth braised short ribs nestled over creamy garlic mashed potatoes, all in a rich, herb-scented sauce that feels like a warm hug.

Cheesy Garlic Pull-Apart Bread
Golden, garlicky pull-apart loaf swaddled in buttery herbs and stretchy mozzarella that begs to be shared warm from the oven.
Did You Make This?
Leave a comment & rating below or tag @royalmorsel on social media!
Rate This Recipe
Share This Recipe
Enjoyed this recipe? Share it with friends and family, and don't forget to leave a review!
Comments (1)
This recipe looks amazing! Can't wait to try it.
Comments are stored locally in your browser. Server comments are displayed alongside your local comments.

Hi, I'm Emma!
What's Popular

30-Minute Meals!
Join to receive our email series which contains a round-up of some of our quick and easy family favorite recipes.